Tag Archives: strip

Walther P38 / P1 Compare & Field Strip

DSCN1447
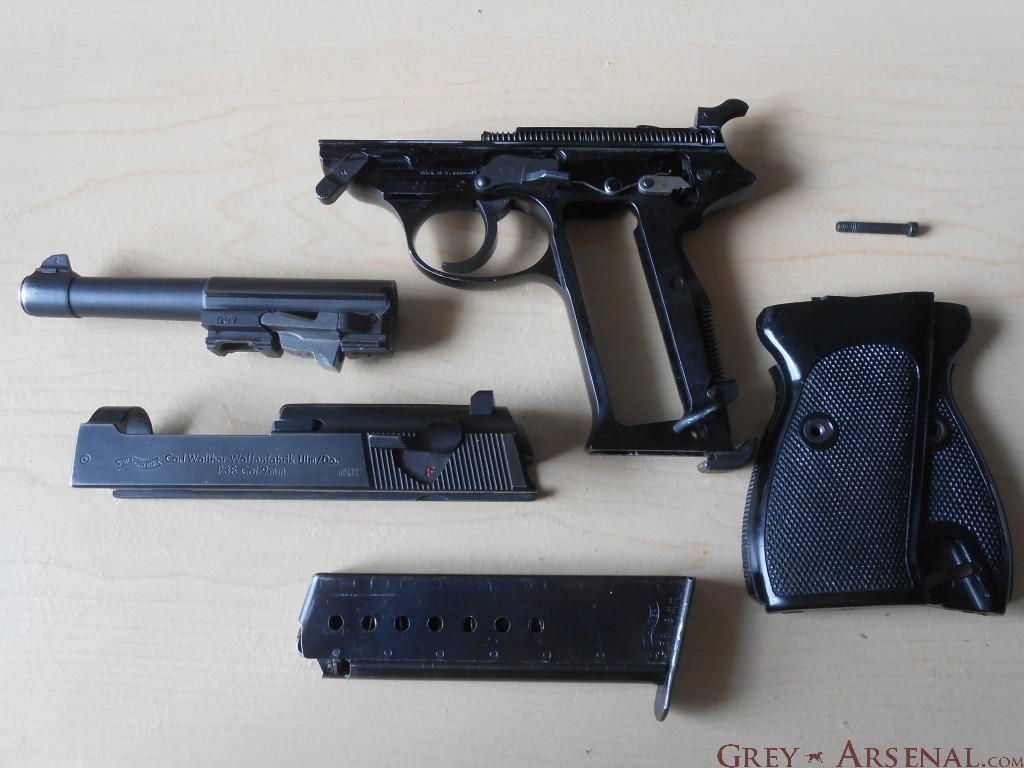
Lets move on last week’s post in France to wartime Germany where we’ll be getting intimate with the Walther P38, and it’s post-war relative, the P1.  First produced in 1939 by Walther Arms to serve as the service pistol of the Wehrmacht, the P38 is a first-of-it’s-kind locked-breech semi-automatic pistol with a DA/SA trigger.  This is also the earliest handgun I’m aware of which includes a Loaded Chamber Indicator (in this case, above the hammer).  More on that later.

DSCN1451

Chambered in 9mm Luger similar to their previously used P08 Luger, this was a more powerful handgun than the other Walther issued to the Wehrmacht, the PP/PPK.  The original wartime P38s were produced from 1938 to war’s end in 1945.  17 years passed before the Bundeswehr announced that they would be adopting the P38 as their service pistol, and in June of 1957 production of the P38 recommenced.  These were produced until 1963, when an updated design was adopted, referred to as the P1, which was finally phased out completely in 2004, replaced by the HK P8/USP.

DSCN1452

The major difference between the earlier P38 and the P1 variant is construction of the frame, which was switched to Aluminum in the P1.  As is visible, the grip design also changed from grooved to checkered.

DSCN1448

DSCN1447

The top example is a wartime P38, and the bottom is a P1 produced in late 1968.

They’re still considered to be great shooters, and while not having the greatest DA trigger pull in the world, their SA trigger pull is extremely crisp, and has the shortest reset I’ve personally experienced.  They’re well balanced, and even the aluminum framed P1 has very comfortable recoil.

ipb-walther-p38

Right, onto the tear down-

  • Remove the magazine via the bottom magazine release, and open action to ensure that the firearm is unloaded.
  • DSCN1454
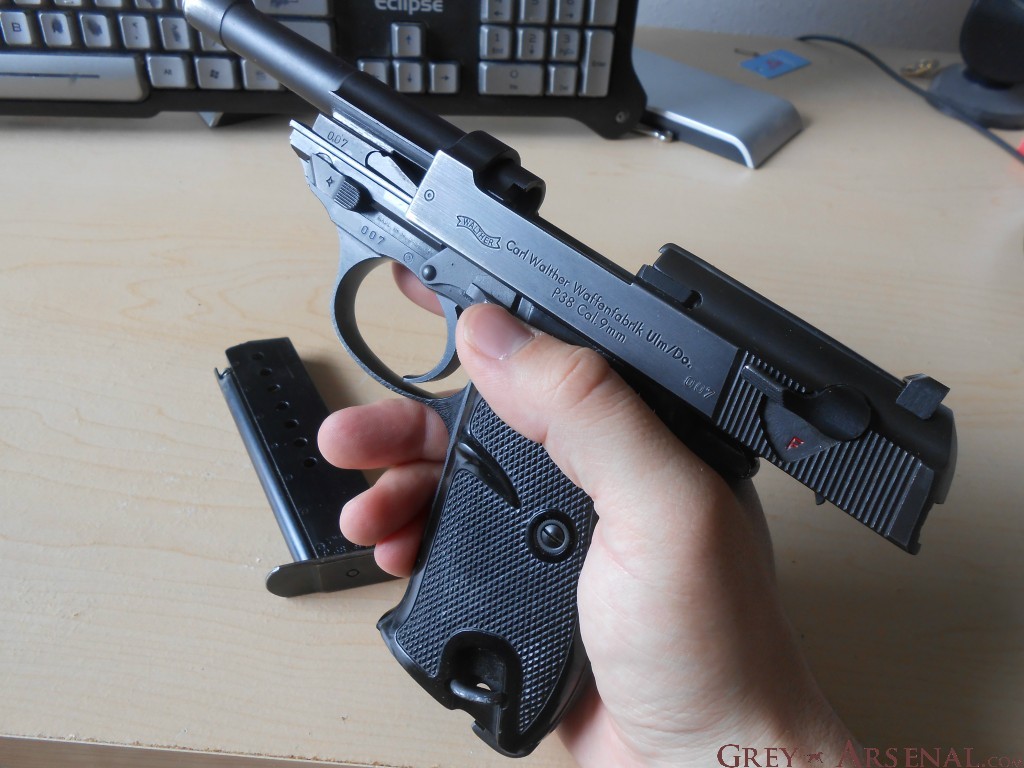
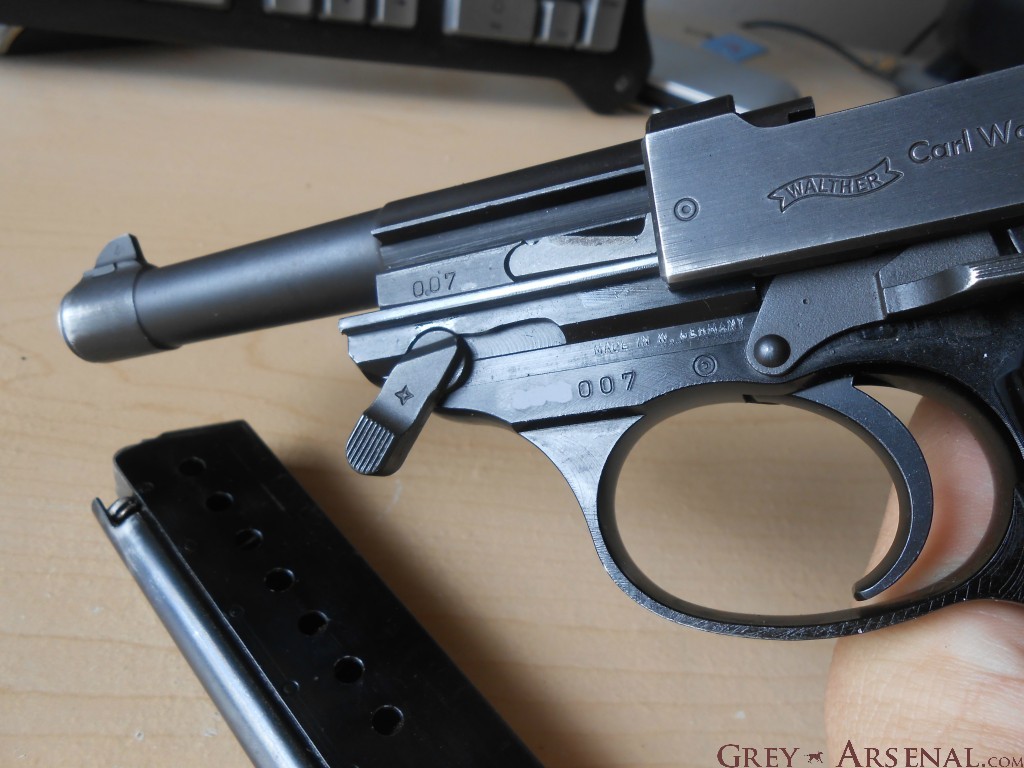
  • Swing the slide release located on the front left of the frame down and forward, noting how it aligns to allow the slide move forward and off the frame.
  • DSCN1455
  • Disengage the slide lock if necessary, and move the slide forward only to the point where it would normally rest.  At this point, de-cock the hammer to allow the slide to be fully removed from the frame.  The de-cocking lever may be used carefully, but it’s preferable to just lower the hammer gently while using the trigger.
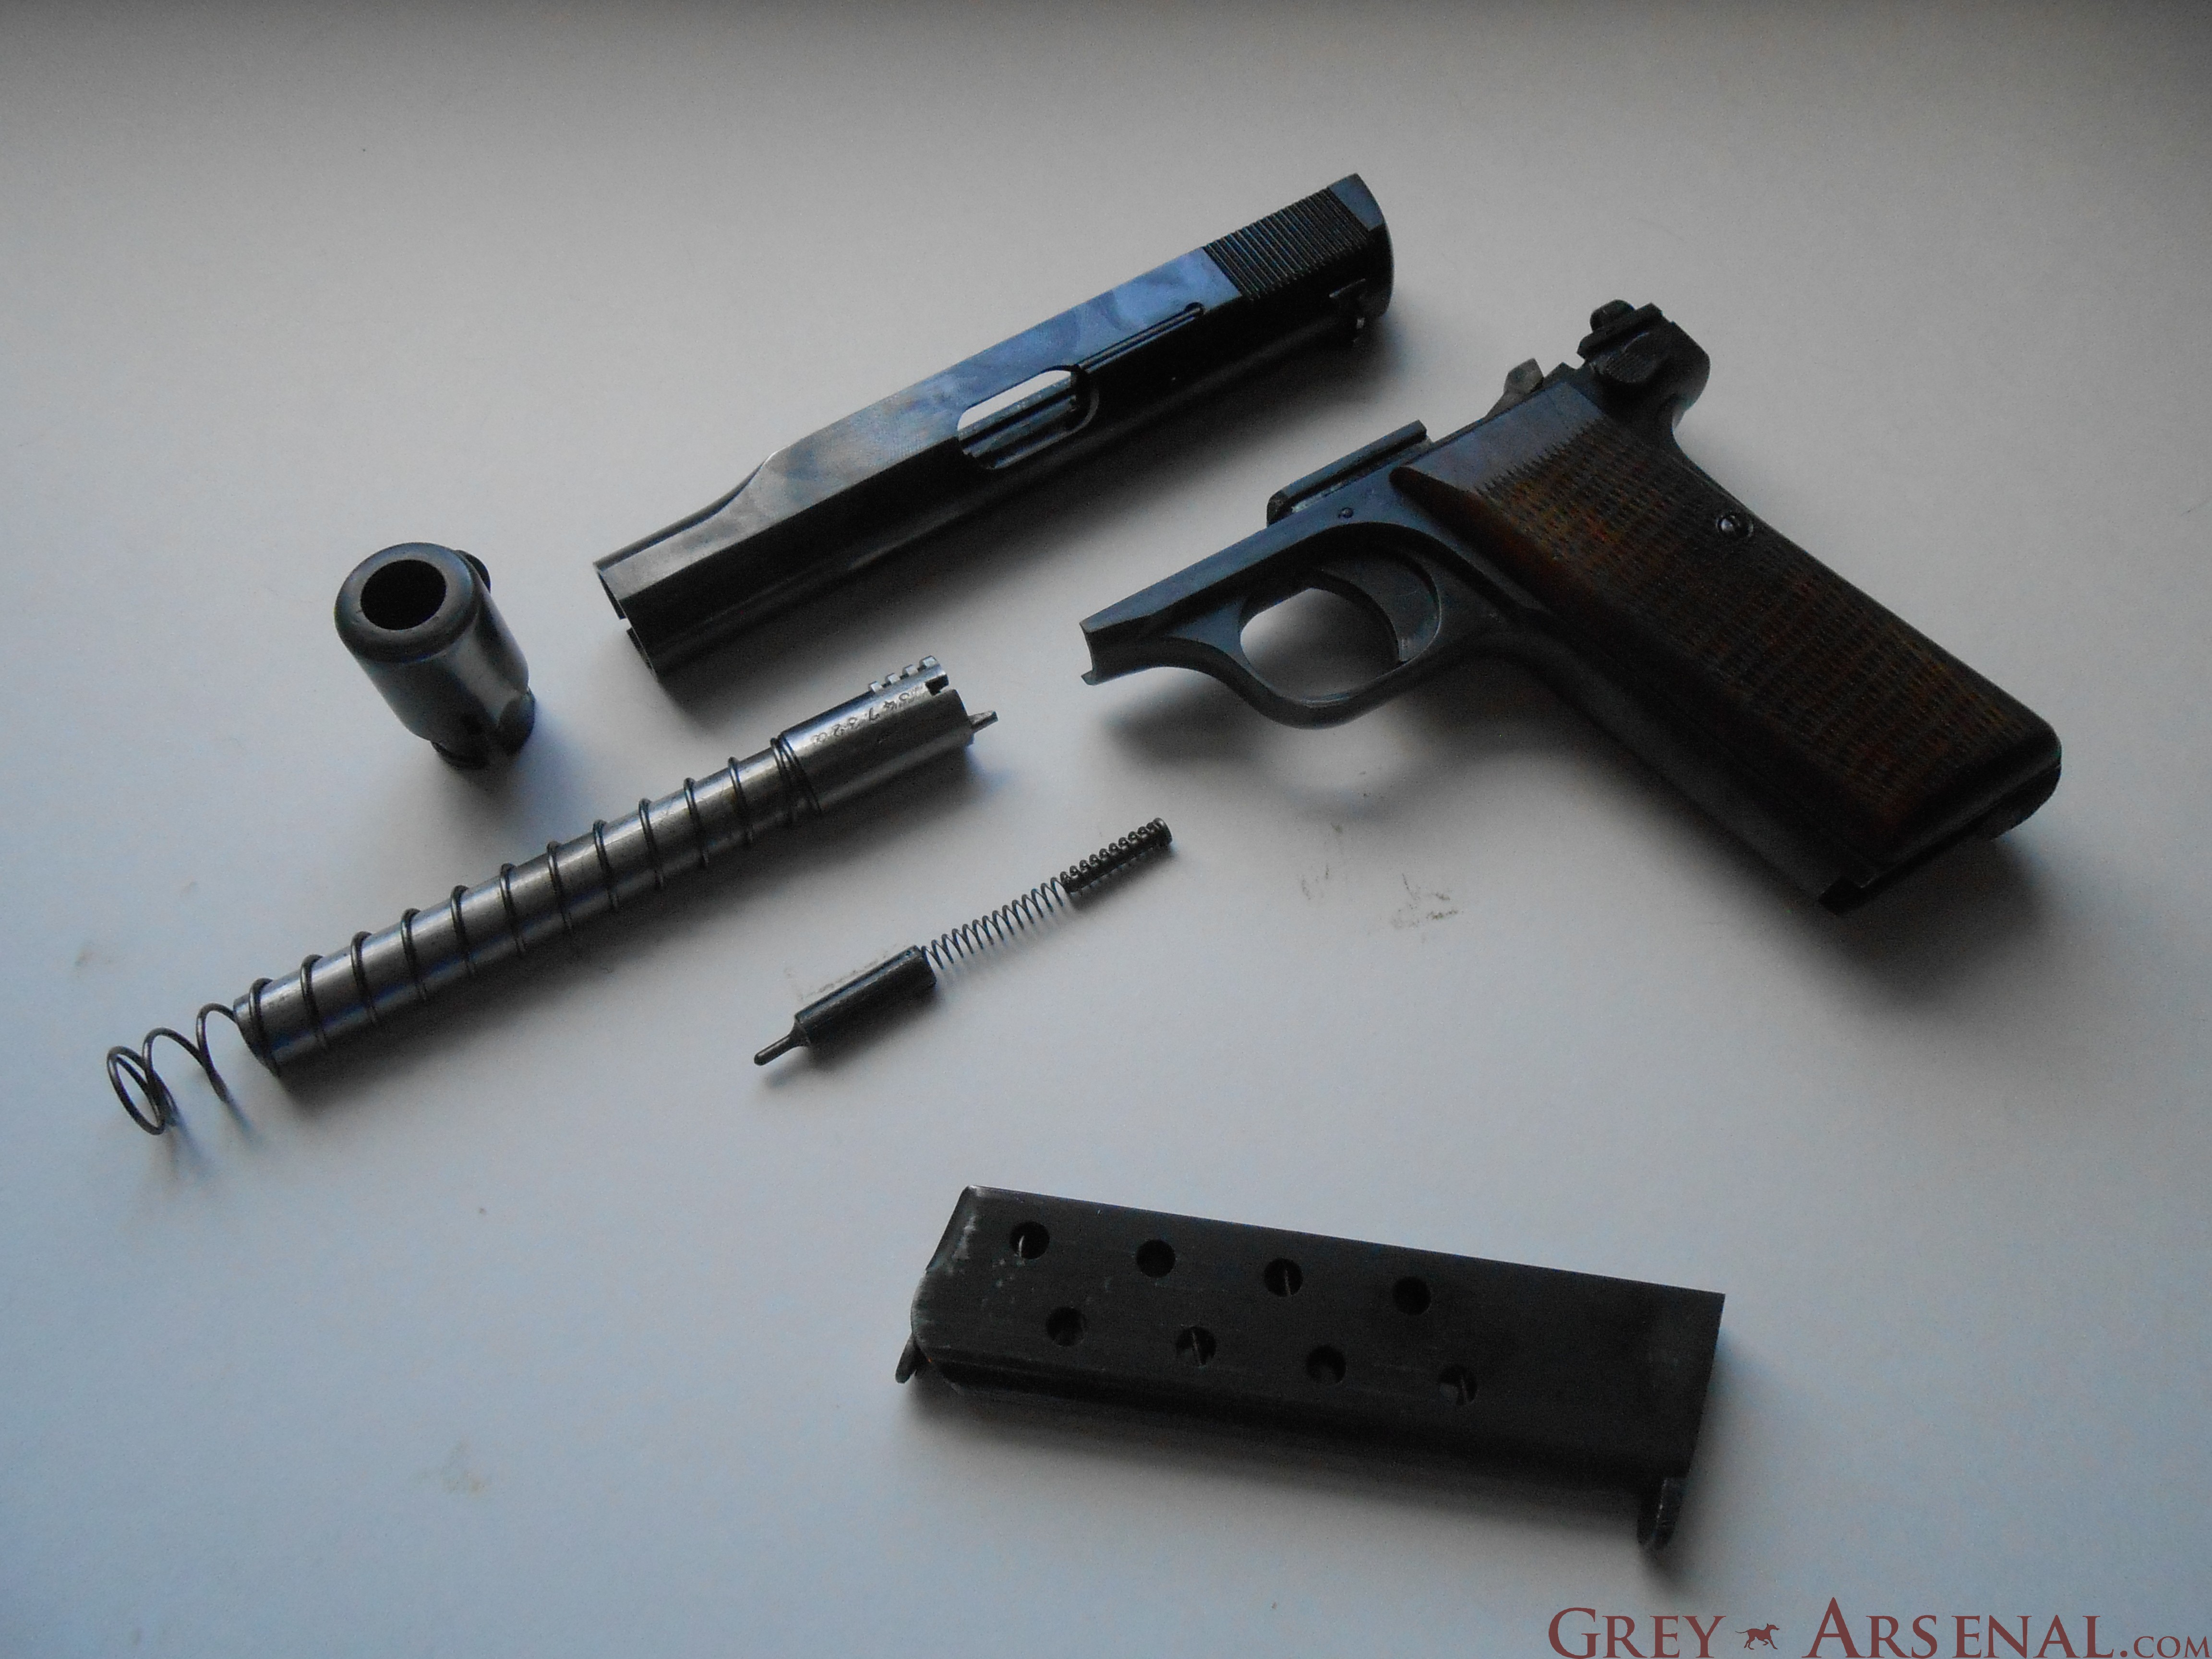
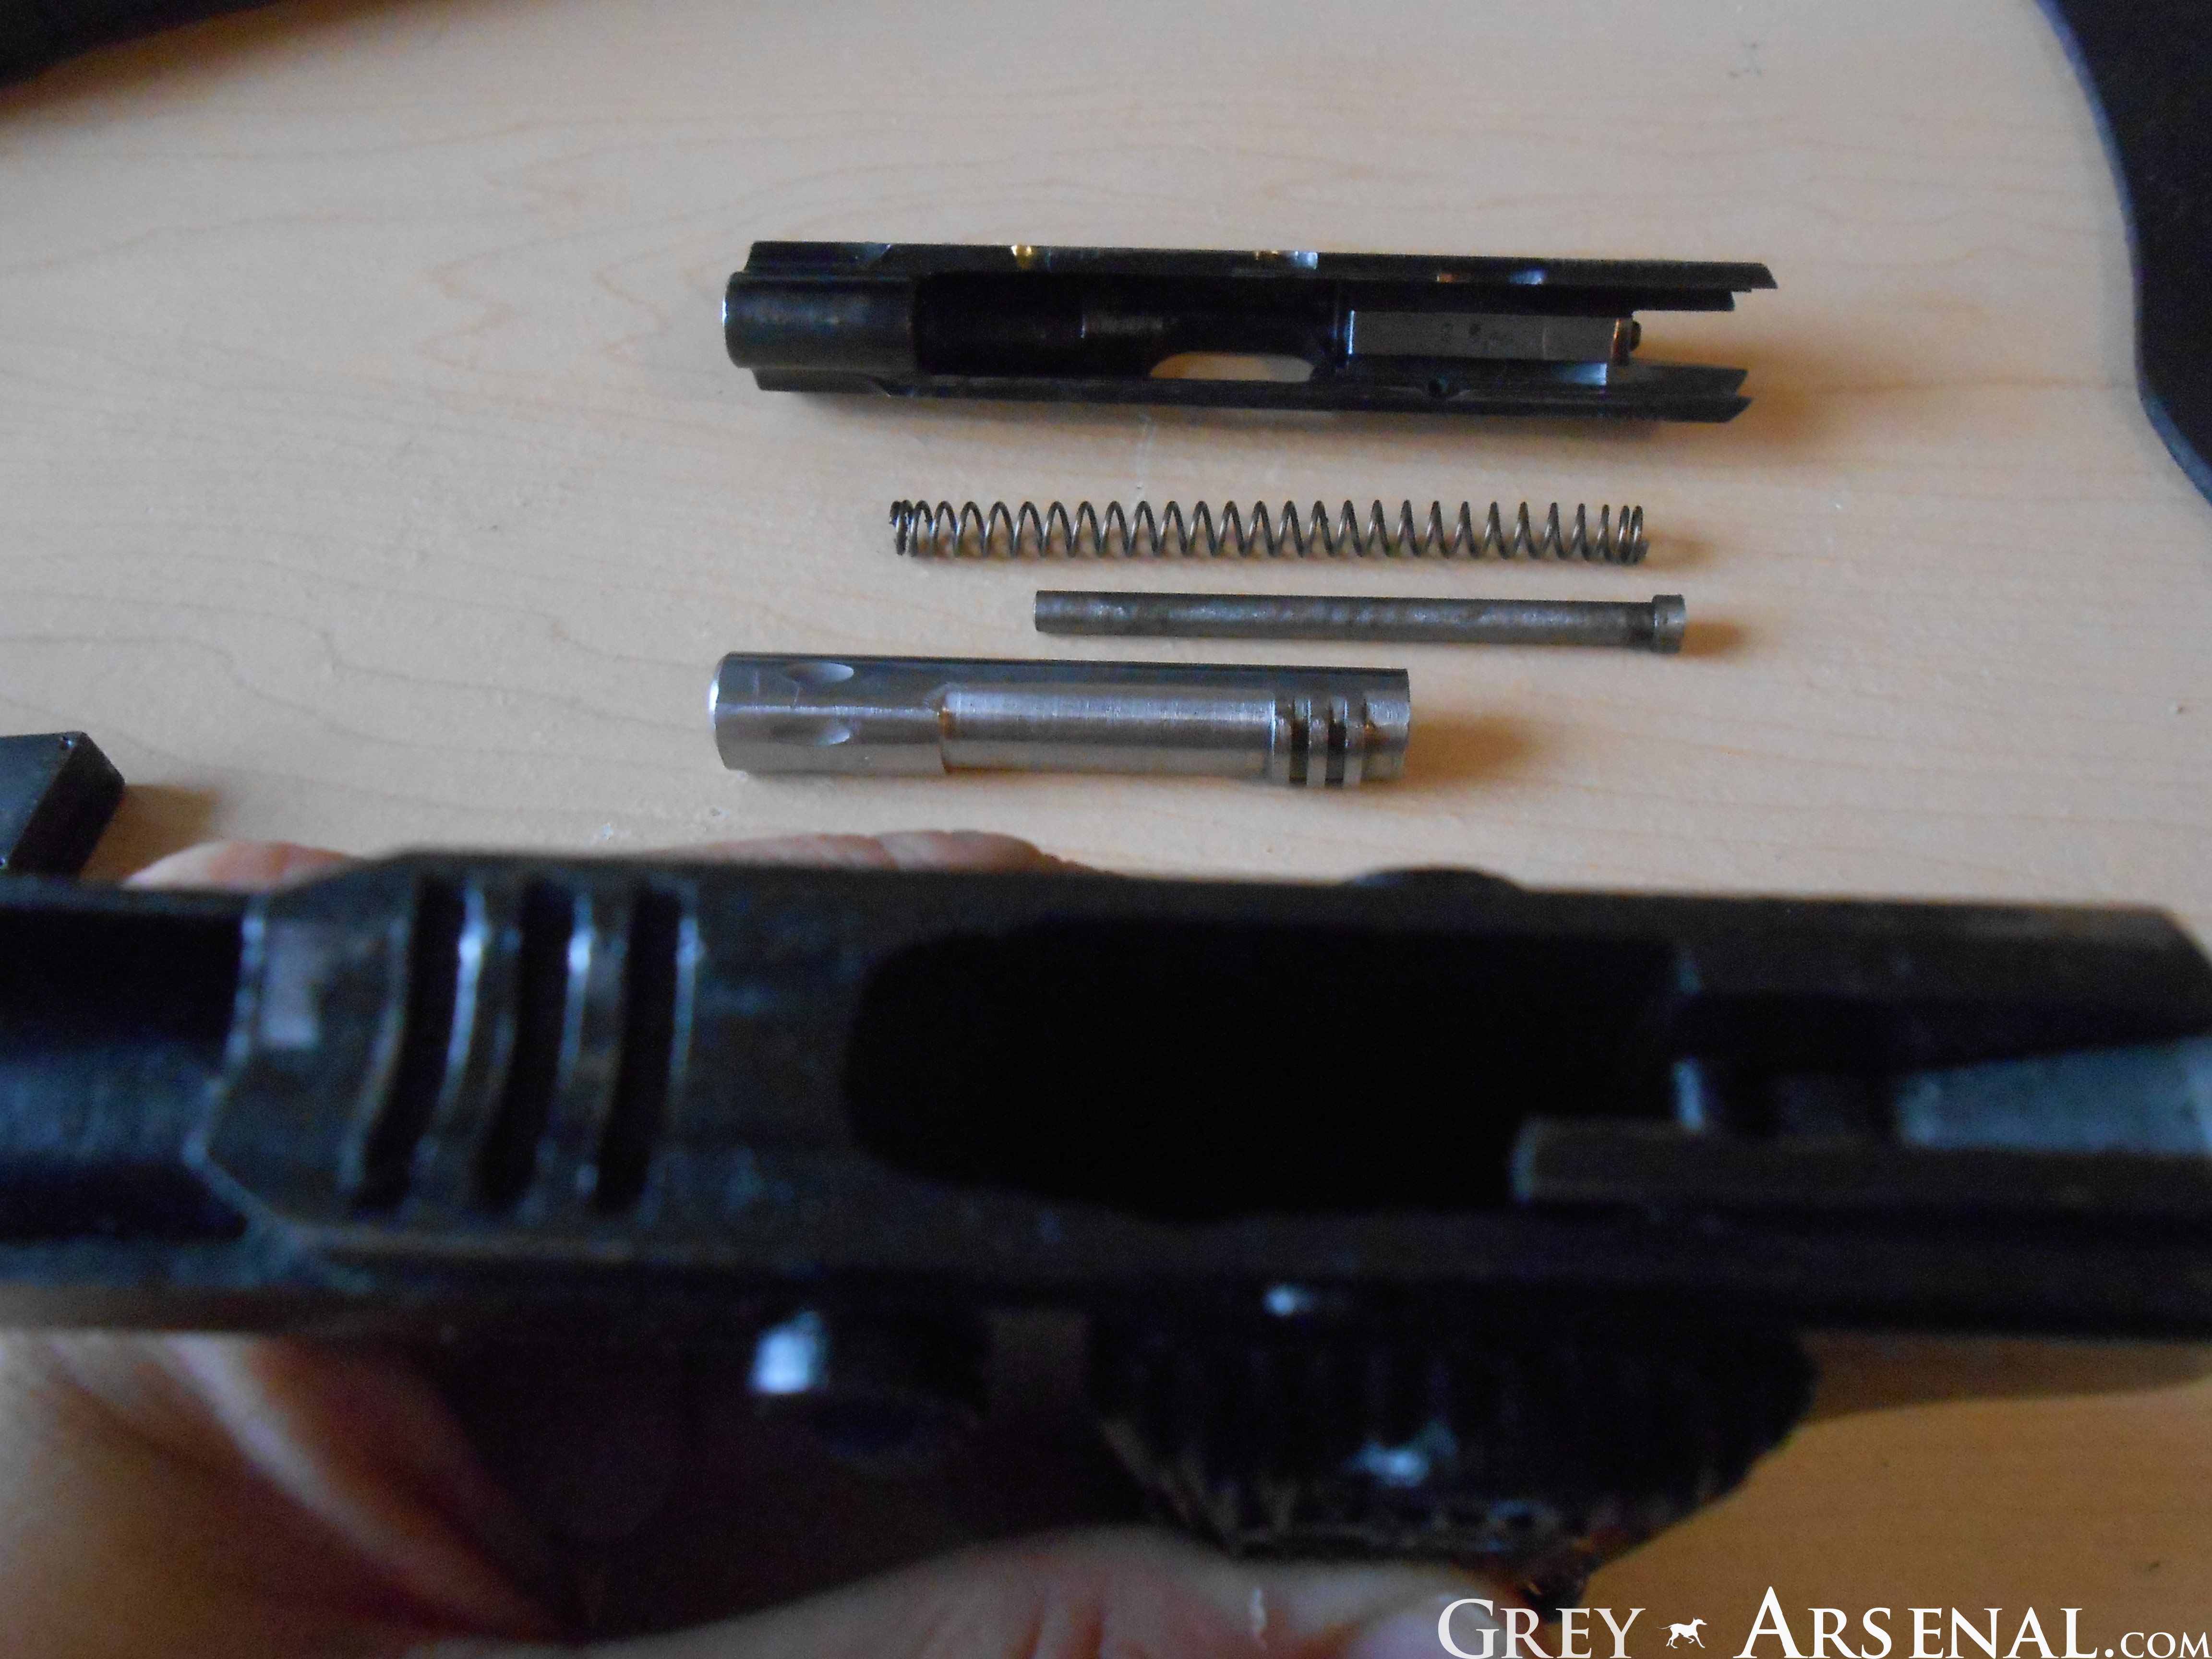
  • To remove the barrel from the slide, simply push the “button” (locking block operating pin) visible at the rear of the barrel assembly, which will push the locking-block wedge out a bit, allowing the barrel assembly to be withdrawn from the front of the slide.
  • DSCN1458
  • DSCN1459
  • DSCN1460
  • At this point, you have access to everything you need for a decent simple clean ‘n lube.  Notice the unique dual recoil springs on either side of the frame.  These can be removed, if desired, by either using a small tool to pull the spring back away from the contained rod at the front far enough that you can remove the rod, then withdrawing the spring OR using a tool to push the spring forward a bit from the rear until it can be extracted from the wider area at the rear.  I prefer the first method, but didn’t bother showing it, as it’s rarely necessary, and pretty easy to figure out.
  • One thing I would check out while you have it apart, however, is the Trigger Bar and Sear are interacting correctly.  To get access to this, use a small flat-head screwdriver to remove the Grip Screw from the left side of the firearm.  Remove the right side grip panel first, then maneuver and remove the left side panel, taking care not to damage it on the slide release.
  • DSCN1461
  • DSCN1464
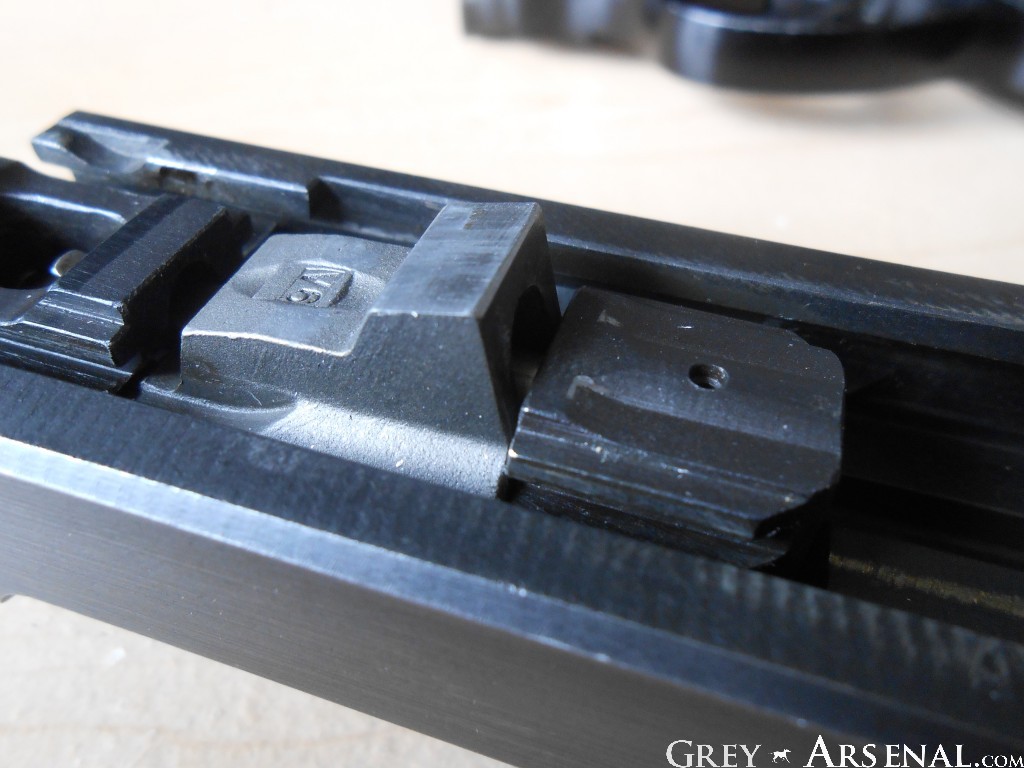
  • What you’re looking for is on the right side of the frame, previously covered by the right grip panel.
  • DSCN1463
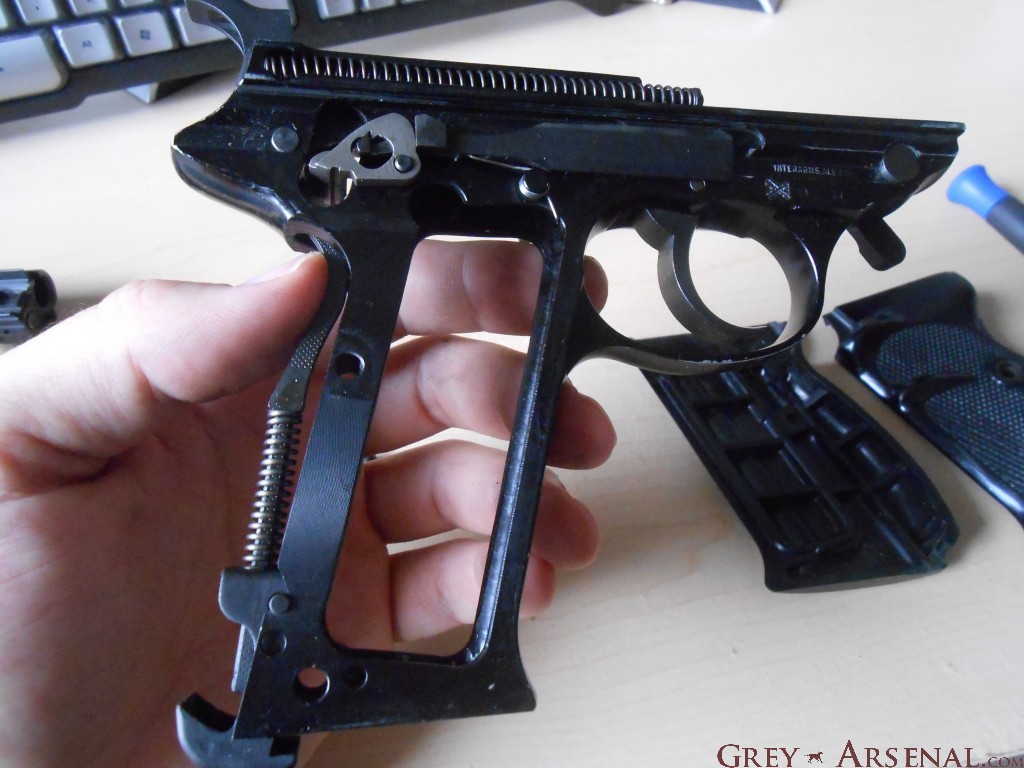
  • The grey part with the hole there is the Sear.  A problem I’ve seen develop with the P38 is the Trigger Bar spring coming loose, and not forcing the “duck bill” hook of the Trigger Bar from interacting with the corresponding notch in the Sear when pulling the trigger.  This can lead to a dangerous situation where you pull the trigger, no bang happens, and the weapon is now Condition 0, and has a malfunctioning trigger, a VERY dangerous situation.  A weak/worn spring can also cause this.  To check, be sure the spring is where it should be, then cock the hammer, and slowly pull the trigger (lowering the hammer with your thumb) to watch the action of the trigger bar on the Sear.  Watch out for this:
  • DSCN1465
  • If, when you pull the trigger, the Trigger Bar hook doesn’t positively catch the notch in the Sear, you have a problem, and should find a replacement Trigger Bar Spring.

Reassemble in reverse order, making note to insert the barrel assembly into the slide with the locking-block pushed out (that is, button pushed in so the locking-block is lowered), and when replacing the slide to the frame, make sure to push the locking-block back up so that it’s able to stay with the slide when you retract it far enough to re-engage the slide release.

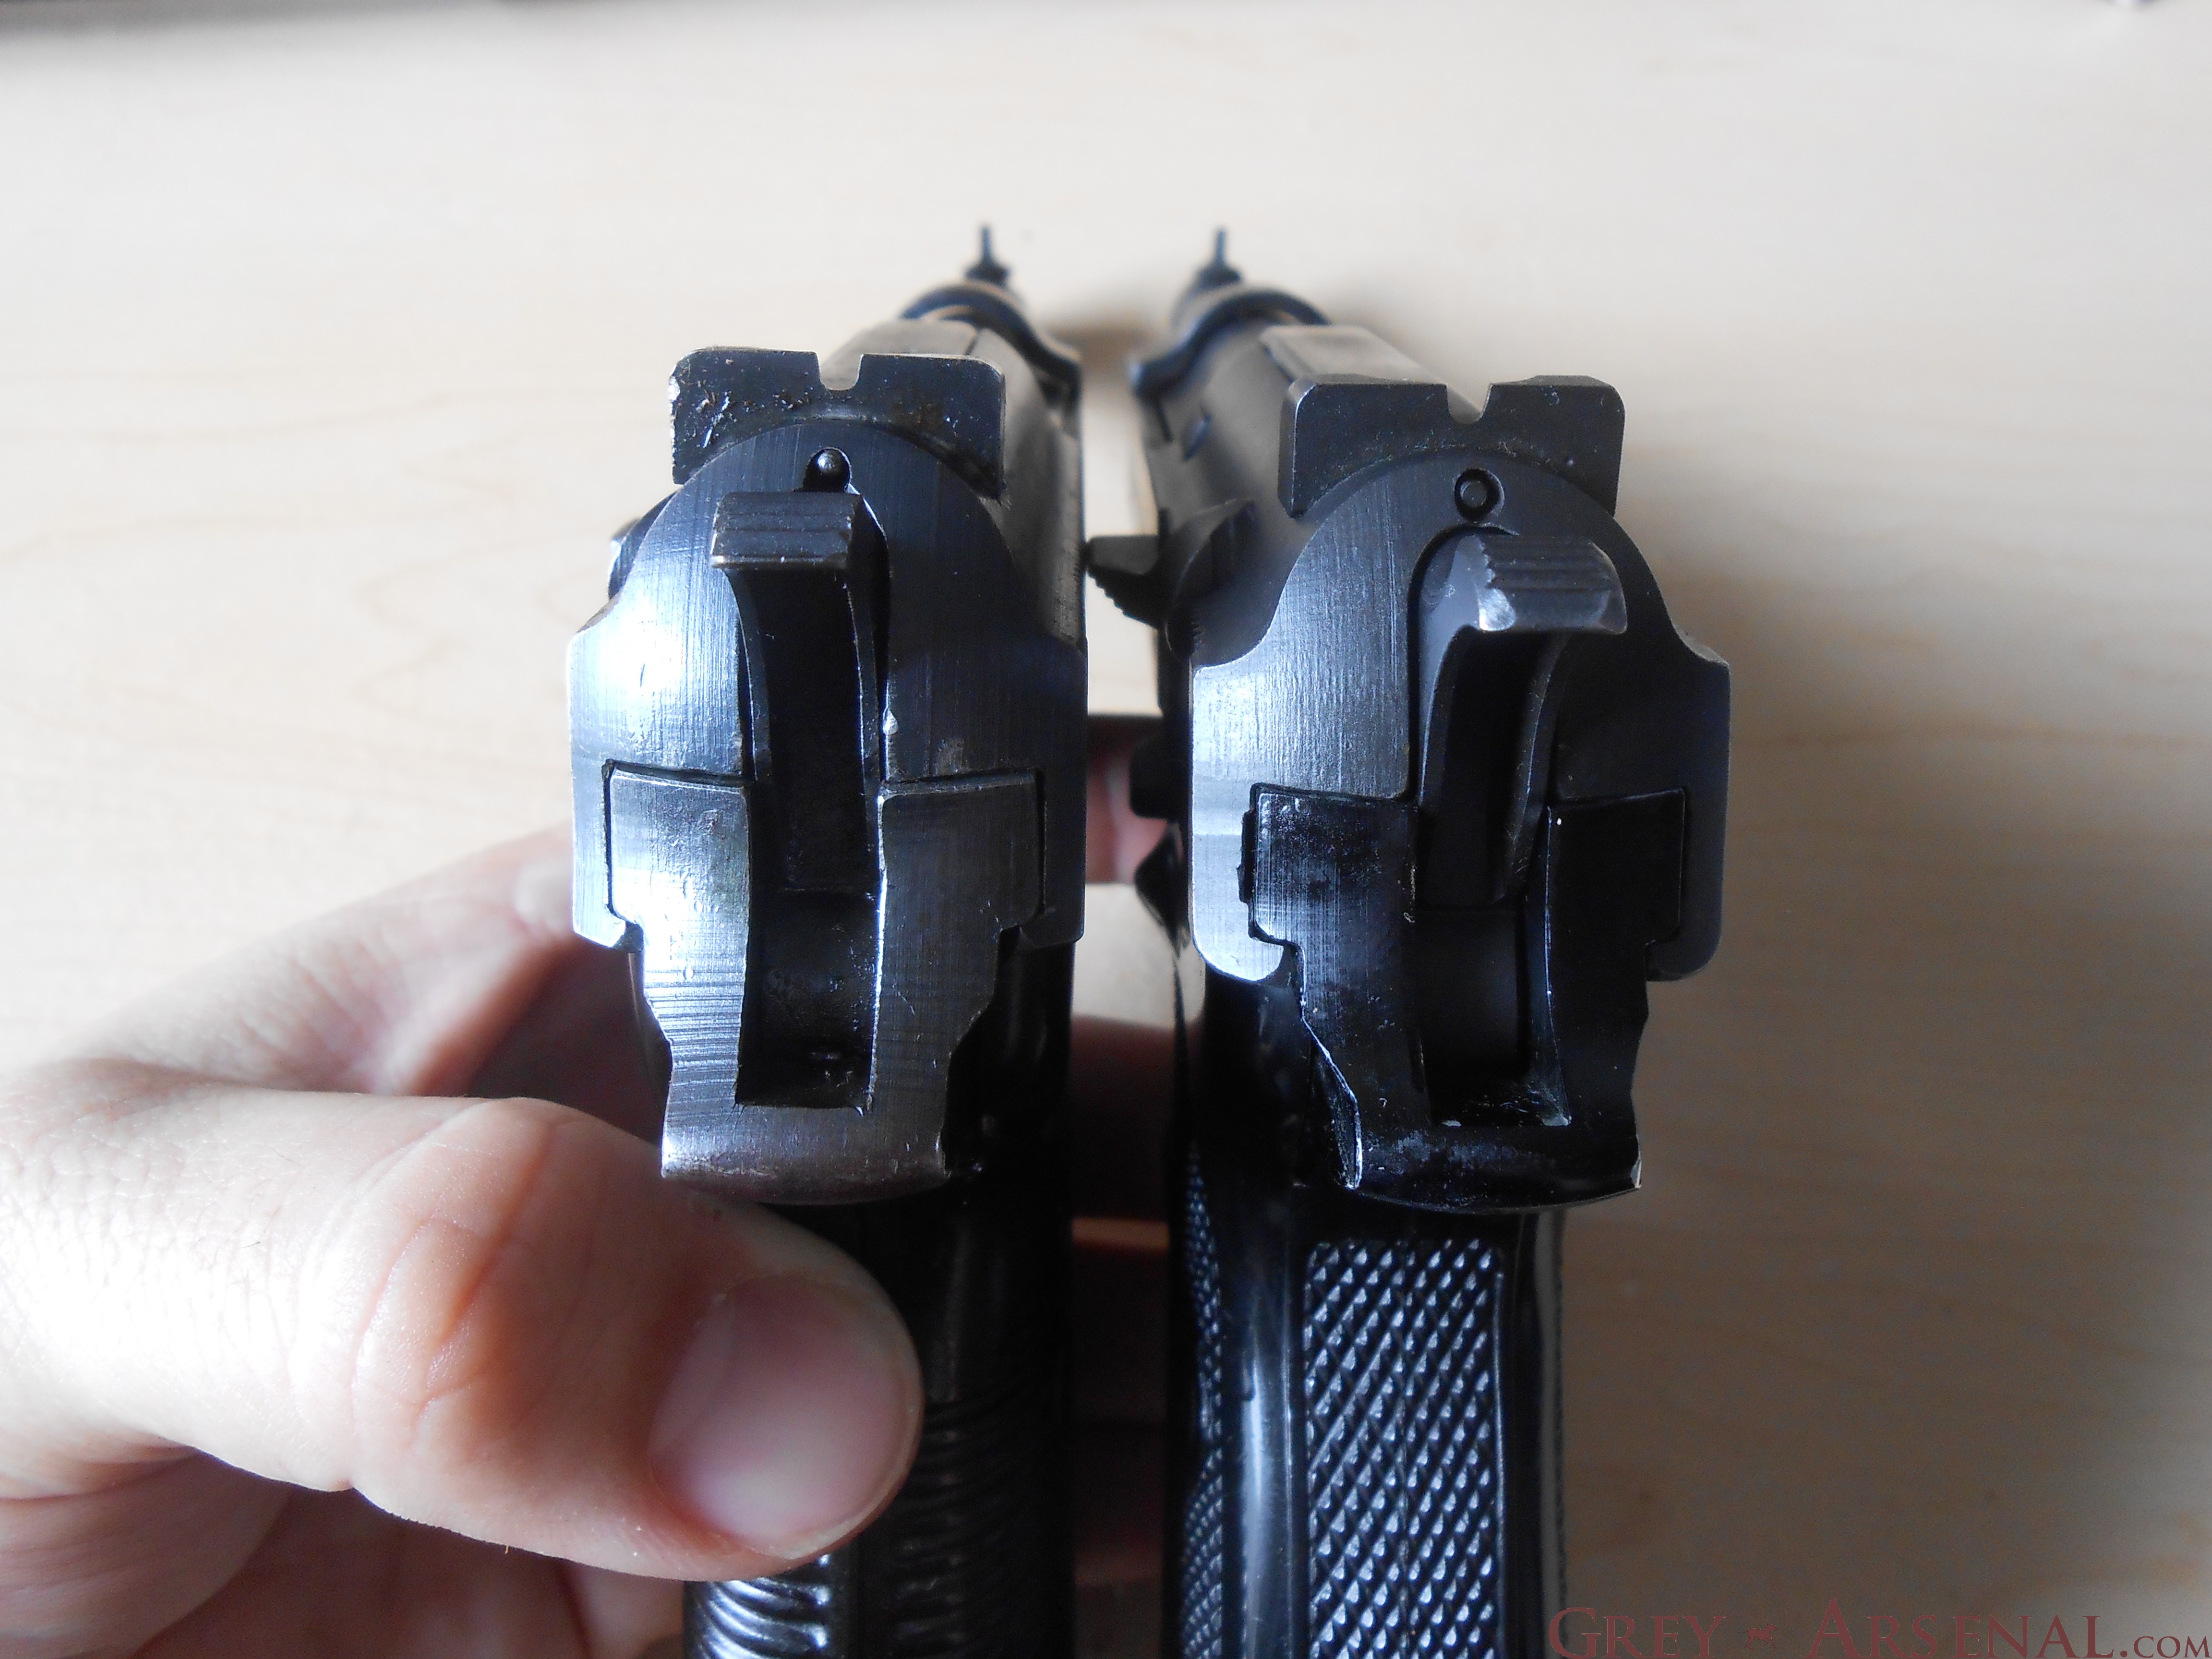
Oh, one more thing to share!  The Loaded Chamber Indicator I’d mentioned.  Pretty interesting really:

DSCN1467

Note the protruding post at the top of the breech face?  When a round is chambered, that rod is pushed back against a weak spring, and out of a small hole above the hammer on the rear of the slide, making this visible:

DSCN1468

There are slight differences between the P38 and P1 in the design of the “Cartridge Indicator Pin” channel (as evidenced below), but it works the same way on both.

DSCN1450

Next week, I think we’ll get back to a more familiar end of the 20th Century.

“Unique” Model 17, “7.65 Court 9 Coups” Field Strip

DSCN1432

So, we’ll go ahead and continue with the series on don’t-build-them-like-they-used-to handguns, and this time, we’ll be moving from Belgium to France.  Specifically, Hendaye, France- as this was home to Manufacture D’Armes Des Pyrenees (MAPF) from ~1923 to 2001.  From 1928 to 1944, they produced this handy little shooter, the Unique Model 17.DSCN1434

As you can see, the markings on the slide state 7.65 COURT 9 COUPS “UNIQUE” which, I have to admit, made identification of exact model a tad difficult.  What the markings on the slide are indicating is “7.65 Short (7.54 Browning), 9 Cartridge” and then the type of weapon “Unique” which referred to the brand.

DSCN1443

As I said, it’s pretty handy, and though it has quite a bit of heft to it, it’s very well balanced.  Functionally, it’s fairly similar to a handgun I’ve previously talked about on this blog, the Colt 1903 Pocket Hammerless (misnomer, as the Colt simply had a hidden hammer).  That said, the craftsmanship is no where near as fine as on the Colts or FNs from this era.  The tolerances are very loose, and though when assembled and shooting it feels fine, are very noticeable when you break it down.  The finish work throughout is also pretty terrible, and it shows when looking at the condition of many surviving examples.

So, on to the guide.

  • Remove magazine and ensure firearm is unloaded.
  • Retract slide to the point that the safety lever can be swung forward and catch the slide.
  • DSCN1436
  • Similar to the Colt, rotate the barrel 90^ clockwise (from front)
  • Disengage catch and withdrawl the slide from the frame.
  • Rotate barrel 90^ counter clockwise and remove from slide.
  • Remove Guide Rod from Frame and pull the Spring off of it.
  • DSCN1437
  • This is as far as you need to go for a basic cleaning.  Grip panels can be removed easily with a flathead screwdriver to access the Trigger Bar and clean out the Magazine Well if required.
  • Clean thoroughly and oil all contact surfaces.  These include the Barrel Lugs (frame and barrel), slide rails, and a light coating on the barrel itself and the Guide Rod.  Basically, if it looks like something rubs it, get a light coat of something on there.
  • DSCN1440
  • Reassembly can be a bit tricky due to the loose-as-hell tolerances I mentioned.  Getting the Barrel to re-engage with the Barrel Lugs in the frame can be a PITA since there aren’t any markings as some others (Colt) include.  But, I’ll give you the foolproof method here at Grey Arsenal
  • Reinsert Guide Rod into Spring, and reinsert the assembly into the hold in the Frame below the barrel, in the orientation it was originally (see earlier pictures if needed)
  • Replace the Barrel into the Slide, and when able, rotate 90^ Clockwise to lock it into the slide (term used VERY loosely).
  • Begin to replace Slide onto the Frame, taking care to line up the Guide Rod with it’s place in the Slide.
  • DSCN1442
  • At this point, things get fun, and by that I mean extremely frustrating if you haven’t done this before and aren’t using an awesome guide like mine.  You’ll want to move the slide back to the point where you can engage the safety/slide lock again, but be sure to move the barrel with the slide with one of your fingers.  If not, the loosey goosey tolerances will cause the Barrel to move around in there and you wont get it to engage the lugs.
  • DSCN1436
  • Once you have it locked up, Rotate the Barrel 90^ Counter Clockwise, which may be tough depending on the level of lubrication you gave it, and your particular Model 17.  Once you’ve rotated it properly, you should be able to disengage the Safety and the slide won’t be able to be pulled off.  Give it a try- if it comes off, try again.  If it stays put, Congratulations.

DSCN1444

For most owners, this handgun is the definition of a Curios & Relics class firearm, it’s an odd, storied little French autoloader that was probably handed down and down from a relative who brought it back as a WWII trophy.  Although it’s a “small” caliber, as I’ve mentioned before, some hot-loaded 7.65 rounds are still no joke, especially when you have a small package like this that can have 9+1 of them being carried Condition One.  Given the choice between this and a contemporary sub-compact concealed carry such as LCP or Sig P238 in .380, I’d readily choose the one that probably saw a WWII battlefield, or the mean, baguette-scented, streets of 1930’s Paris in the hands of a LEO.  Did I mentioned how nicely it fits in your palm?

FN Model 1910/22: John Browning goes to Europe

DSCN1394

In a previous post, I covered the Colt Model 1903, now we’ll move on to another John Moses Browning .32/.380 design which, just as before, and as always, was ahead of it’s time.  Except this time, Colt didn’t want to make it, and looking back with that 20/20 hindsight, that was probably a poor choice, since the FN Model 1910 was in production all the way until 1983.

DSCN1396

Innovations in this model included a new type of recoil system, wherein the recoil spring surrounds the barrel.  This made for the handgun’s signature slim design and light weight, as it removed the need for a guide rod.  This style was later used in the Walther PPK and made standard in the Makarov.  It also incorporated a Striker firing mechanism, included a grip safety similar to the earlier Colt 1903 and later 1911, a magazine safety (no trigger activation without a magazine inserted), and an external safety lever at the rear.  This made up what was referred to as the “triple safety.”  Hmm, an innovative striker fired handgun with triple safety features… can we get some photo comparisons between JM Browning and Gaston Glock, we may have an immortal engineer on our hands.

DSCN1395Anyhow, in 1922, some modifications to the design were made, lengthening the barrel, slide, and handgrip, lending to increased accuracy and an additional 2 rounds in magazine capacity.  This was done for the purpose of military contracts.  Sadly, the military they’re most associated with would be the German army, as they were produced by the Nazis after Belgium was occupied.

This guide is specific to the  Model 1922 or 1910/22, but for a Model 1910, simply ignore the steps involving the Front Barrel Cover.  Obviously (but I’ll say it every time) make sure the weapon is unloaded, and no ammunition is in your workspace.

  • Remove magazine from weapon by pressing the magazine release on the bottom of the grip to the rear, and withdrawling.  Also, disengage the thumb safety if it’s engaged.DSCN1397
  • Find the lever on the front lower left of the slide, this is used to release the front barrel cover on the 1922 model.DSCN1398
  • Twist so that you’re twisting the front sight blade towards the right side of the weapon.  When it’s at 90^ from it’s original position, the front barrel cover should pop off revealing the front of the barrel and spring.DSCN1399DSCN1400
  • This is the only tricky part, as unlike the Colt 1903 and other handguns that use a rotating barrel design, there’s no mark showing you how far you have to pull the slide back to free the barrel to rotate.  See picture for approximation, but basically slide it back slowly and keep attempting to twist the barrel (same direction you turned the barrel cover).  Once you have rotated it as far as you can, you should be able to withdrawl the slide forward off of the frame.DSCN1401DSCN1402
  • Rotate the barrel the rest of the way in that direction until it’s lugs are no longer locked into the slide, and withdrawl it from the front of the slide.  Remove spring for cleaning.DSCN1403 DSCN1404
  • Remove the firing pin from the rear of the slide.
  • Clean, then reapply lubrication to obvious contact surfaces (groves, barrel lugs, etc.) remembering that a little goes a long way.DSCN1405DSCN1408

Reassembly:

  • Reinsert firing pin into channel, observing how the post fits into the grove.DSCN1406
  • After replacing the recoil spring, reinsert barrel into slide from the front with the lugs facing down.  When the lugs are lined up with the gap where they engage with the slide, rotate the barrel 90^ into them.
  • Replace the slide onto the frame and again begin feeling for that spot.  When you’ve found it, rotate barrel the opposite way as before until it locks in place.
  • Attach front barrel cover with the front sight blade 90^ from center to the right (same direction as when it popped off).  Push flush with the frame and twist so that you’re moving the sight blade back up into position, it will click into place.  Be sure not to do this backwards, or you’ll end up with a front sight post on the bottom :pDSCN1409