Tag Archives: Glock

PSA AR-9 Hybrid Review

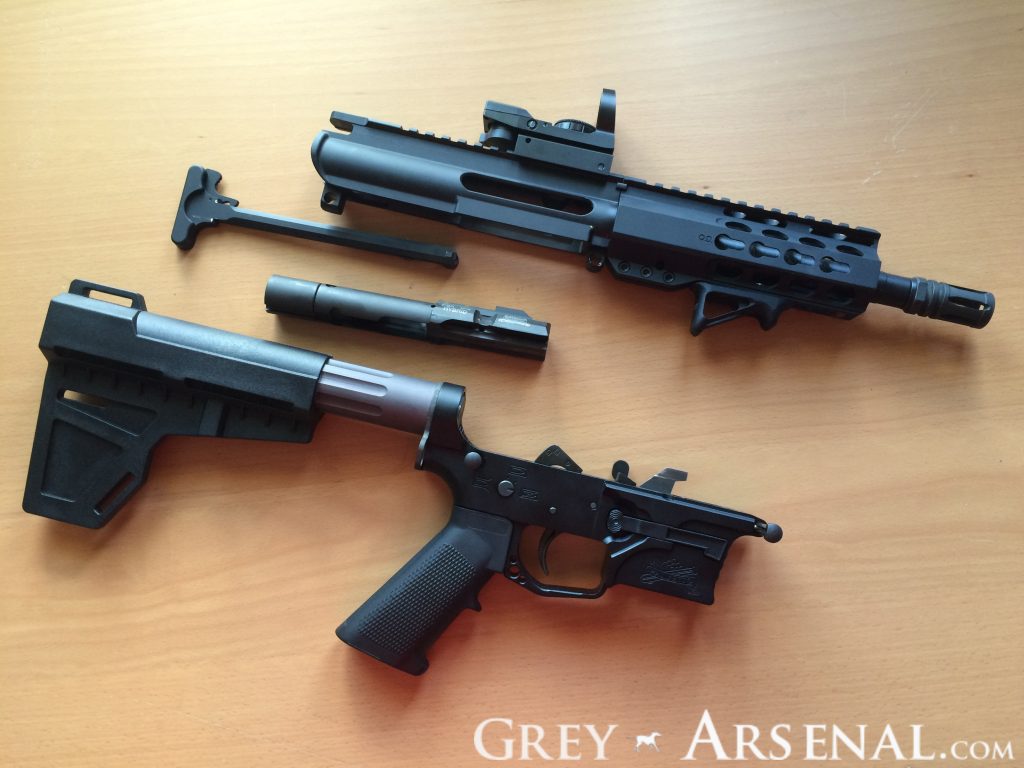
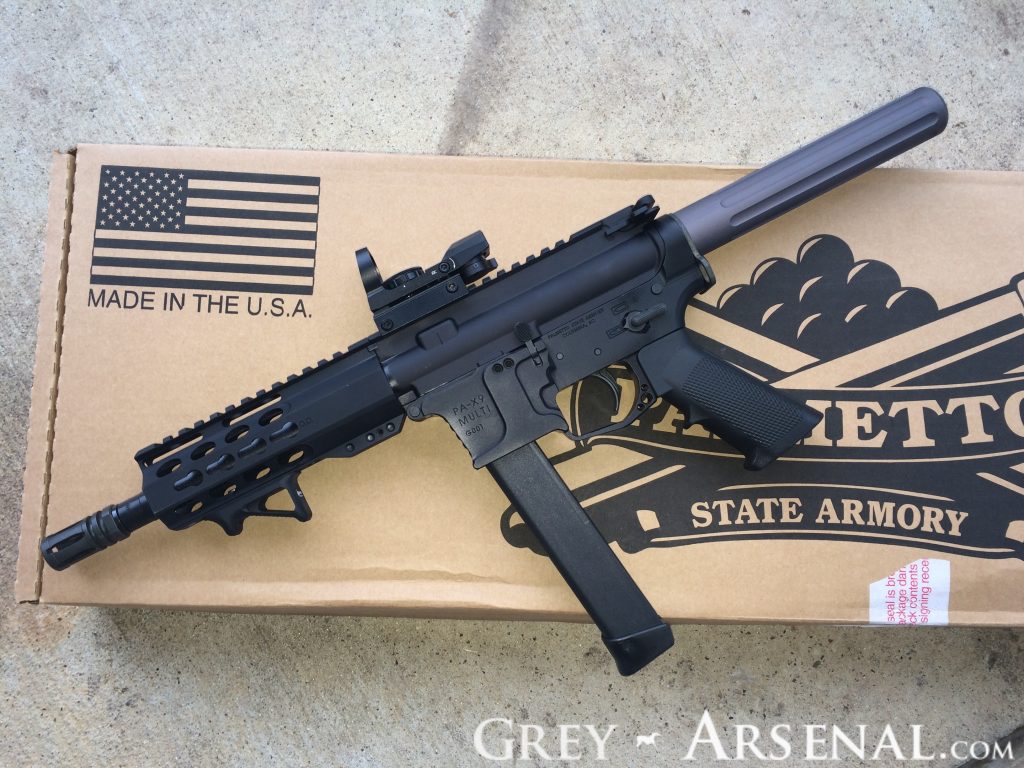
I need to begin this one with an important note: The device seen attached to the pistol buffer tube is a Shockwave Technologies Blade Pistol Stabilizer, which includes an ATF letter indicating that installation of this device and proper use does constitute assembly of an NFA item.  More details on that later.


ar9_greyarsenal1

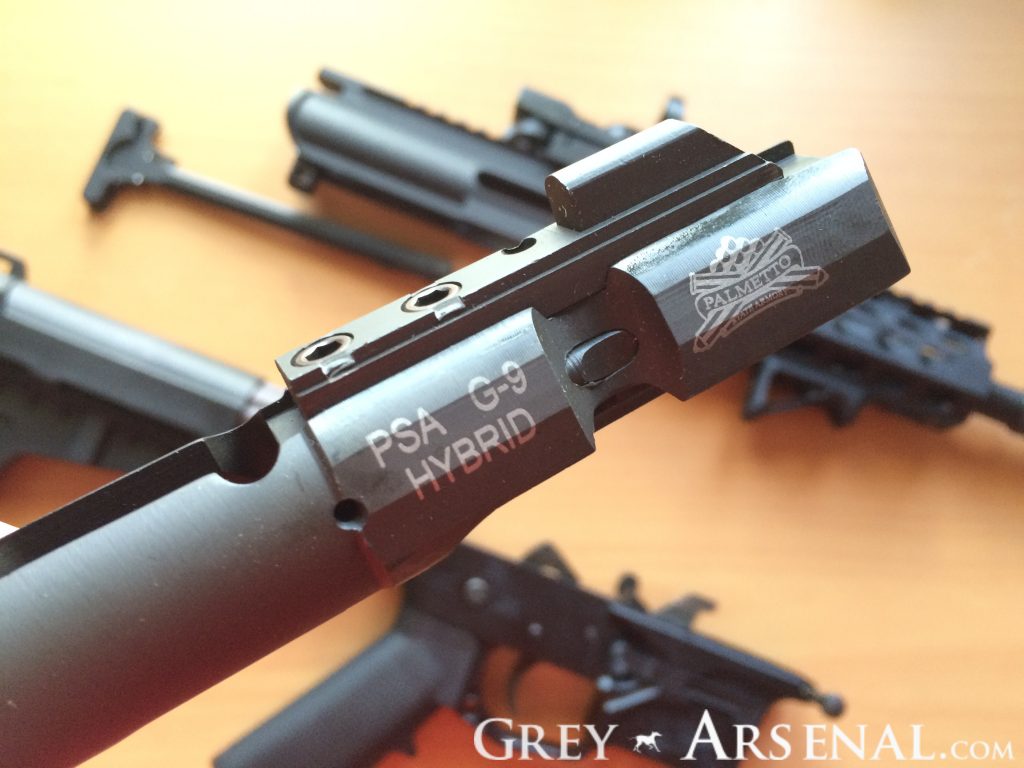
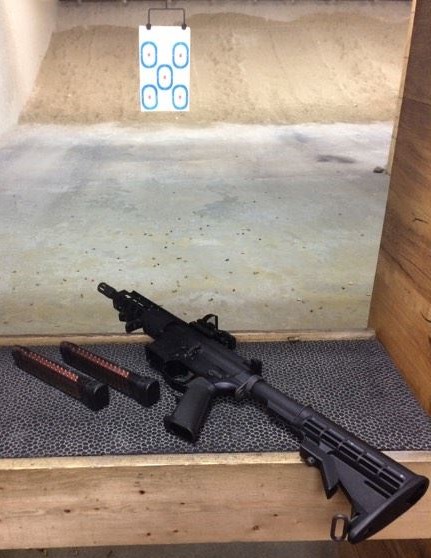
In a masterstroke, PSA decided to make what they’ve termed a Hybrid BCG that allows use of either Colt SMG-style or Glock magazines with the same upper/BCG.  It’s ramped, so depending on the lower / hammer you’re using, it’ll be easier on your hammer pin, if that’s a concern.  Being PSA, one of the preeminent sources of AR Lowers and pretty much anything else you’d want for an AR build on the cheap while still being able to trust the craftsmanship, they’ve also introduced a few complete 9mm uppers in various common lengths with various popular handguard / rail configurations.

ar9_greyarsenal20

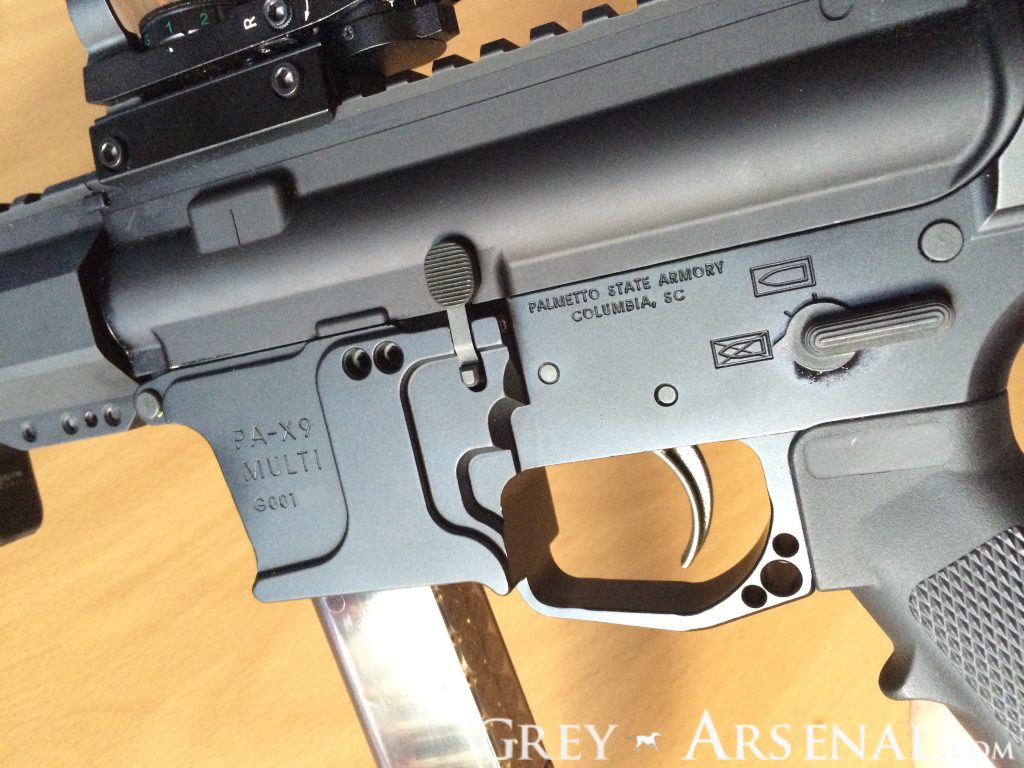
While they’ve already had both uppers/lowers and complete rifles using their previous AR-9 BCG and dedicated lower for Colt SMG magazines, to coincide with release of this Hybrid BCG, they’ve introduced a dedicated Glock Magazine lower (which appears VERY similar to the popular Quarter Circle 10 GSF lower).  So if you were looking to build a pistol-caliber AR, and already have a good number of Glock 9mm magazines (and who doesn’t?), this can *significantly* cut down on the cost of kitting up for your new firearm.

ar9_greyarsenal19

Granted, that Dedicated Glock Pistol Lower has been pretty difficult to catch in stock, but when you can catch it, it’s significantly cheaper than the comparable Quarter Circle 10 product, and both the pistol and rifle lowers come with PSA’s pistol buffer.

ar9_greyarsenal23

While it would be tempting just to get what’s in stock, depending on your build plans, it would be easy to run afoul of the ATF’s “constructive intent” laws with regards to NFA items, in this case, having what you need on hand to construct an SBR.

In my case, I while I *do* plan on SBR’ing this pistol (and plan to do a write on up that process and in the involved costs), I wanted to start with a 7.5″ pistol build, which I’ll eventually build into an SBR by replacing the pistol buffer with a Mil-spec buffer tube and standard AR stock.  Just be wary of what other parts you have laying around, and don’t get tempted to play around with this topic.

ar9_greyarsenal17

Back on topic- with the task of building a short 9mm AR pistol that can share magazines with my Glocks, and keep things relatively cheap, I decided on the following:

While not currently available, the total cost of this build at the last time the upper and lower were available would be:

  • Lower: $249
  • Upper: $349
  • Optic: $21.99
  • Handstop: $47.26
  • Sling: $23.99
  • Stabilizer: $51.28
  • Total as configured at last available prices: $742.52 (w/o shipping)

As far as the optic- I wanted to try something lightweight and cheap and see how it stands up to use on this 9mm.  I definitely wouldn’t recommend something not proven (i.e., not significantly pricier) on a firearm intended for self defense use, this will be a chance to review a lower-priced optic on what is, for the mean time, a range toy.  Once it’s SBR’ed, unless I’m *really* impressed with that optic, it’ll probably start wearing a Mepro or Aimpoint Micro.

ar9_greyarsenal7

As far as quality of the PSA upper and lower, everything bolted together as intended, no rattle, and I’ve experienced 0 failures for the first 400 rounds of 124gr 9mm.  This thing is *so* fun to shoot infact, that I’m thinking of Suppressing it after it gets SBR’ed, at which point I’m not even sure anything else would make it to the pistol range with me unless I needed to practice for something specific, even as gimped as it is in not using that brace as a stock and just using it for cheekweld, it’s just that fun.

ar9_greyarsenal14

That’s that for now, I’ll follow up when I get my Form 1 stamp and can properly finish this thing.  Also, stay tuned for individual reviews of the optic, Odin Handstop (I like it.), and the Stabilizer.

Update 6/21: Form 1 submitted, now we play the waiting game.
Update 2/15: Form 1 Approved after nearly 8 months.
Magazine Review: ETS & Lancer

Title

First off, let me apologize for the assault on your eyes that is the above image.  It was created in MS Paint on a laptop via touchpad.  If it has caused any bodily harm, please contact me and I’ll give you the contact information of my attorney.

Okay, so there are a couple of fairly new contenders out there trying to give Magpul a run for their money on polymer magazines.  In a recent project, I tested Lancer’s L5 Advanced Warfigher Magazine, or “L5AWM” magazine in it’s most relevant 30-round configuration with my Windham AR.

While these aren’t brand-spanking-new, they’re new enough that some folks I showed ’em off to hadn’t seen them yet or heard of them, whereas I’m sure any of them could’ve ID’ed a PMAG from a mile away.  They have been getting some attention at SHOT and in other marketing venues, as I’ve been seeing them pop up in pictures of new ARs or platforms using STANAG type magazines, and seem to be the preferred magazine used in SIG’s marketing of the MCX.  Of course it’s today’s SIG, so they probably just picked them because they looked decently sci-fi to go with everything else they’ve been doing lately.

So, aside from looking futuristic enough for SIG, how are they?  Pretty good, actually- Mine were the “smoked” color, which seems to be the most popular.  It’s nice to get a visual read on your round count from any angle, and to even be able to quickly visually identify which ammunition is loaded, and not have an open slit on the side like the window’ed PMAGs.  The material feels a bit harder than the polymer used by Magpul (and Troy), but doesn’t feel the least bit brittle or flimsy.

L5-AWM

The metal upper, which gets these referred to as “hybrid” magazines, sets these apart, and inspires confidence.  It also allows use of the standard loading tool when loading them from stripper clips.  While this has gotten to be standard for other polymer magazines, it still feels nice to have that metal-on-metal contact when doing so.

As far as actual performance, I’ve had roughly 1000 rounds between 3 of these and haven’t had a single failure.  While that’s also singing praises to my Windham AR and the Federal XM193 ammunition being used, not having a single magazine-related failure over that span, even while trying to be a bit more rough than usual, reflects well on these.

They were selling for real cheap for a while, and had been available from Wilson Combat on sale for ~$12 when I snagged them, but they seem to be hitting ‘Flavor-of-the-Month’ status with a price and stock level to reflect that.  At the time of writing, they seem to be going for ~$20.

Edit: Also, happened to find this showing a drop test between these and PMAGs.  Glad someone else decided to repeatedly drop their AR for our benefit, because I wasn’t about to test ’em that hard just for your benefit.


Next up: ETS Glock Magazines

IMG_6724 Edited_zpsajdj7ohj

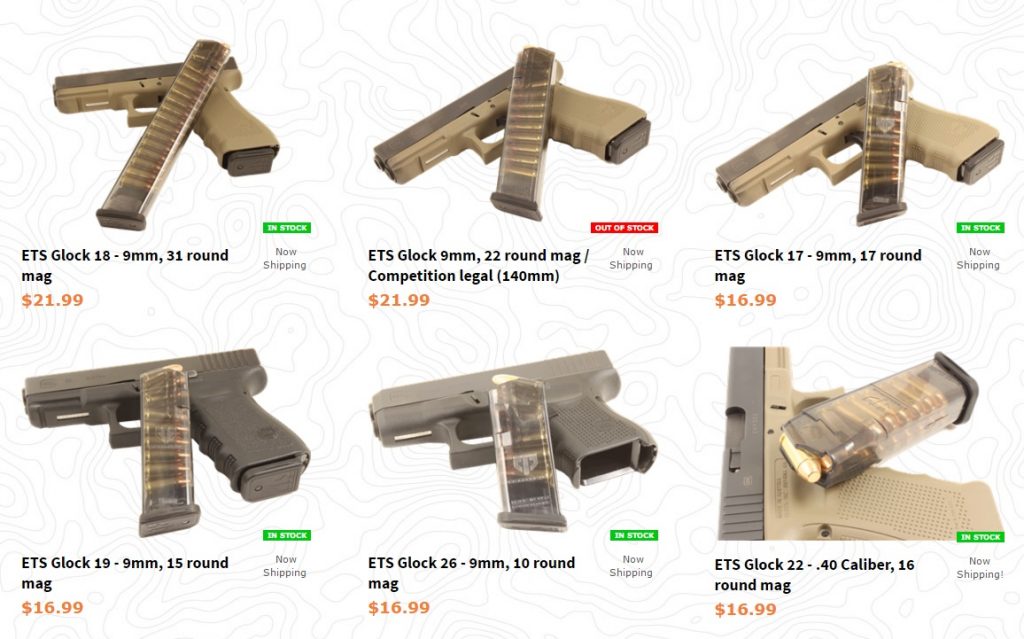
Alright, so these actually *are* new enough that I can definitely call them new, as they seem to have just been announced last October and just started hitting the market around the time of SHOT.  ETS (Elite Tactical Systems), in addition to another translucent polymer AR magazine, brings us translucent polymer Glock magazines.

ets site

Currently available in a variety of sizes and capacities, generally made to match common varieties, that is, a 17rnd Glock 17 sized mag, 15rnd Glock 19 sized mag, 10rnd Glock 26 sized mag, and a 31 round Extended mag.  They’ve also got 10-round limited varieties for folks in places where that’s required, and a 22rnd “Competition Legal” length magazine (140mm).  So, no matter what you’ve got as far as 9mm or .40cal Glock, they’ve got you covered.  They’re also fully compatible with Glock OEM floorplates, and disassemble in the same manner, so feel free to slap a 7151 “+” plate and insert on there and get an extra round or two in ’em.

Also, notably, they’ve beaten Magpul to the market, as Magpul has yet to release their Competition length and Extended magazines, which are currently scheduled for release this summer.  Magpul’s offering also seems to be a bit odd in that they have a lower capacity in the same size magazines compared to both OEM and ETS, their competition, with extended magazines being 21 and 27 round capacities, respectively.  They’re also not compatible with OEM or other aftermarket floorplates, as they seem to be proprietary.

While I haven’t tested these as extensively as I have the Lancer mags, I can say, while my initial impression was a bit leery, due to the cheap-ish feeling polymer and what seemed to be a clearly visible thin-gauge spring, the 31 round magazine performed flawlessly in both my Glock 19 and a PSA 9mm AR pistol over the course of 350 rounds, with only a single FTF in the AR pistol which doesn’t appear to be a fault of the magazine.

One notable quirk, however, is that while these drop free when empty, when fully loaded, they seem a bit tighter going into both platforms with which I tested them.  Not prohibitively tight or anything, but just similar to using magazines that don’t drop-free, kind of like I’ve experienced with some other (very cheap) non-OEM Glock magazines, or older G17 magazines.  Loading one less round seems to have resolved this (30 instead of 31) completely, and I’ll update once I install “+” plates on both.  The company mentions typical marketing-sounding statements about being able to store loaded without worrying about the feed lips, and makes statements about drop tests, and I can confirm dropping and banging these things around both at the range and on an outdoor concrete slab wasn’t able to cause an harm to them in any way or cause any failures, but I just thought this was worth noting.

GLK18 In AR_zpscxxoq9cj

At ~ half the price of equal sized OEM Glock magazines, I don’t mind using these for practice, but I’m not sure I’ll trust them for carry until I’ve had the chance to beat them up a bit more and see how they old up.

Edit: Having now had about 1,500 rounds through them feeding an AR9 with no failures, I know they’re at least reliable at that, and they’ve held up to getting lightly banged around.


More Grip for the G42

v5In my previous post reviewing the Glock 42, I mentioned one of the minor drawbacks of the handgun, and a drawback of all subcompact handguns, being that the grip was too short to get your entire hand around.  Even with the tiny hands this gun was meant to fill, you’re left with a pinky hanging off.  Most smaller handguns come with, or at least have an option for, a magazine with an extended floor plate to give you that extra bit, the Walther P22 and Beretta Pico, for instance, come with both types of magazines.

v7While Glock currently offers an extension for sale, it’s not quite as, well, aesthetically pleasing, as a set I found on Glockmeister (where you may remember me finding the parts needed to complete my Glock 19 brass-to-face fix).

v1Enter the Vickers Tactical (produced by Tango Down) Glock 42 floor plates.  These give just enough extra to get your last finger on there, without adding too much to the dimensions of the gun.  The taper was a great touch, adding just a bit of functional flair, without looking too out of place.

v3 v8Until there’s an available +1 or +2 floorplate to get that capacity up to something respectable, these will be a fine addition.

v6They’re also easy to install (despite the “Gunsmith Only” warning on the package).  Without going into too much detail here, simply use your Glock Armorer’s Tool to push in the tab on the bottom of the magazine, go in all the way to the handle of the tool, squeeze on either side of the magazine and pry forward with the tool.  Once it starts sliding off, remove the tool, block the bottom with your thumb (or the spring will come flying out) and slide the old floor plate off.  Slide new plate on until it clicks into place, done.  If there’s a request, I’ll do a follow up on how to do this with picture, or a video.

v4So that’s it, for the record, addition of these removes one (-) from the Glock 42 scorecard.

Glock 42 Review

IMG_0759

Well, let me first say, I hope everyone had a good Holiday season.  It’s been a busy few weeks for me, but we did at least get a chance to get to the range and break in one of my significant other’s Christmas gifts.

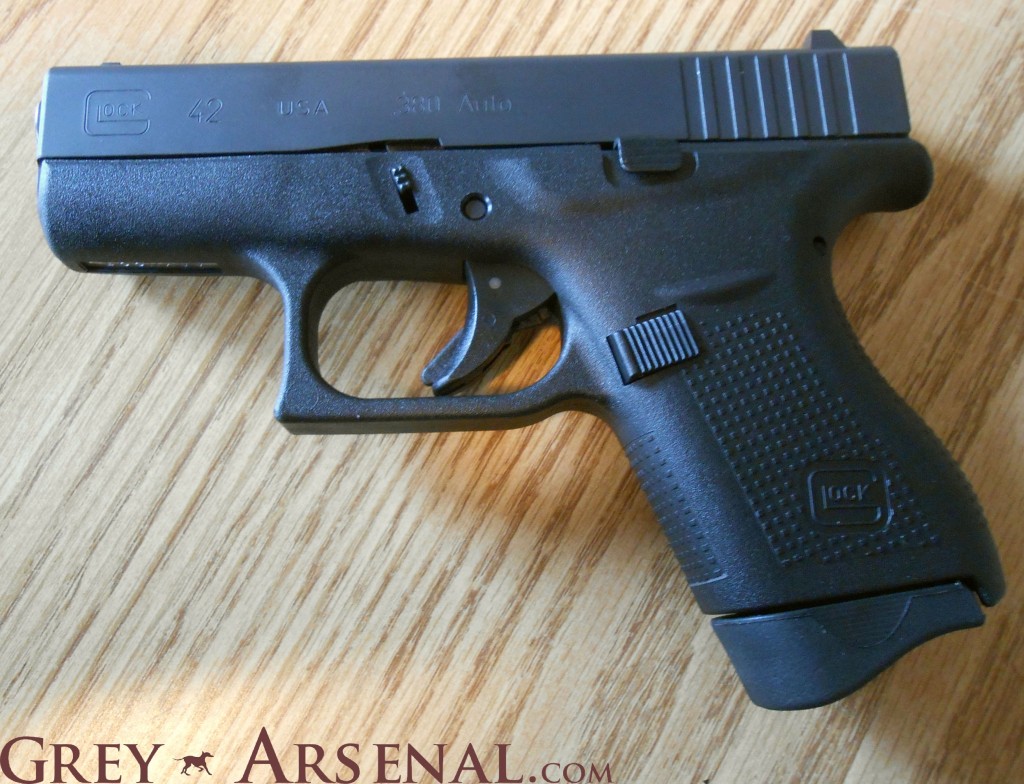
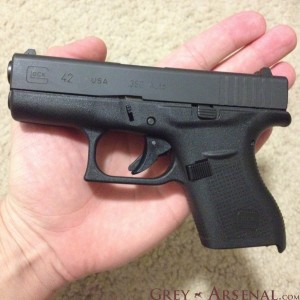
Enter the Glock 42.  I know this thing’s been out for a bit of time now and a review on another .380, the Beretta Nano, would probably be a bit more useful to early adopters, but I also know that before purchase, I scoured for reviews on this thing, and every point of data counts.

Shooter1

Right onto it: Why the Glock 42?  Anybody who personally knows the end user in mind here will know that she has tiny hands.  TINY.  She also has really taken a liking to Glock handguns since being introduced to them- the light weight, the balance, the easy controls, the easy-to-use sights, everything combined to let her shoot more accurately (mostly due to genuinely enjoying practicing with it) than nearly anything else we own aside from a tricked out Kimber Custom Target II.  The problem is, Glocks are fat.  Her shooting was decent, despite not quite being able to get a proper grip on any Glock she’d tried due to the size.  So short of radius-ing the hell out of the grip and hoping to make it a low enough diameter to get her hands around, she’d always end up with sub-standard grouping because of having to reach for the trigger or a bruised right thumb joint from improper grip.  The Glock 42 solved these problems, for the most part.

IMG_0760

First of, it’s tiny, not quite Colt Mustang Pocketlite / Ruger LCP / Beretta Pico tiny, but compared to most subcompacts, this thing is quite the mouse gun.  More importantly, it’s slim, especially for a Glock.  This allows shooters who might be hand-size challenged to get a proper grip on the thing, which is exactly what we were going for here.  Now, there are positives and negatives to this- while it fit her tiny hands perfectly, it still has the same sub-compact issue of length of grip, even her pinky hangs of slightly.  This is easily remedied, however.  The other thing I noticed, was with a proper thumbs-forward grip, this thing sunk so much into my paws that I had to make a conscious effort to not hold the slide release down.  This wasn’t an issue, however, when shooting one handed with either strong or weak hand, and this thing was a pleasure to shoot one handed- this would be a great backup.

IMG_0744

As for functionality- pretty impressive.  It’s not *fully* broken in yet, as we’ve only put 200 rounds through it for our first test.  We used 100 rounds of Aguila 95gr. FMJ as our opener, and 100 rounds of cheapo Academy sourced Monarch 94gr. FMJ to see how low we could go with ammunition quality (while still sticking to factory loads).  In the 200 round breakin, we had a single FTF about 40-round into the down and dirty Monarch stuff, which had been notably weaker than the Aguila.  For a short .380, this thing grouped very well, right in line with other compact Glocks.  One minor nitpick, the 6-round magazines- it’s a tad difficult to get that last round in, as the .380s are short to the point that when loading, the round beneath tends to dip in the front rather than be pushed down, and it takes a bit of effort on that last one.  Due to the difference in Magazine here, the standard Glock speedloader (or SLINO if that’s your opinion on the thing) doesn’t work, and they don’t yet have one out for the 42.  But this is a practice/training issue more than anything.

IMG_0762 IMG_0763 IMG_0761

Mechanically, this thing is just standard Glock, but scaled down.  Not much to say here- disassembly is identical to any other Gen4 Glock.  A note on that- while the 42 uses Gen4 features, technically (at least per a Glock rep I spoke with) it’s a first gen, as this is a new gun.  Whatever… built with Gen4 features, I’m still going to refer to it as a Gen4.

The Scorecard:

+ Size/Dimensions (Great for an EDC)
+ Price (Typical Glock pricing, not LCP cheap, but quality for the $)
+ Manual of Arms (Same as other Glocks, know one, know all)
+ Accuracy (No sacrifice for size, typical Glock sights)
+ Comfort (Despite being as light as it is, very little recoil)
+ Reliability (Only 1 FTF on break-in, otherwise no issue)

– Magazine (6+1 Capacity, really?  Also mentioned loading issue)
– Size? (Might be a bit tiny for big hands without mag extensions)
– Price? (It’s not AS cheap as some other subcompact .380s)
– .380 (Some might complain about this not being a 9mm)
– Reliability issues with early models (not experienced on ours)

shooter2

Glock 19 Gen 3 Erratic Ejection, a/k/a Brass To Face. *FIXED 5/20/2014

DSCN1308b

So, yet again, I’d intended to do a primer on getting a maintenance kit up and running with all kinds of fun links, opinions on products, and pictures- but yet again, something came up that I thought I’d address immediately.  I still may make this a bonus post, however, and still do the post I’d orginially planned, especially as this one will likely be a to-be-continued as I wait for parts and test solutions at the range.

Right, so on to business- I’ve fallen victim to a problem that seems pretty widespread in late Gen 3 (~2013) and Gen 4 Glock 17s and 19s.  Begin typing “Glock 19 er” into google, and it’ll go ahead and complete that thought for you.

It would seem that many people with these guns are getting the original Glock Perfection(tm) experience for the first 600-1000 rounds, but then, startingly, began experiencing extremely erratic ejection behavior along with several flavors of FTEs.  Mine began at about 600 rounds right on the nose- opened the box of the same PMC Bronze that I’d had zero problems with for more than half of the previous 600 rounds (I’ve been talking this G19 up like crazy, seriously, 0 issues with anything I wanted to feed it, it felt like this thing was magic up until this point).  Was all poised to take this thing up to 650 rounds, and within the first 2 magazines I experienced 2 FTEs and noticed some brass marks on the front of the ejection port.  Made it through 40 rounds with no additional problems before handing the Glock off my lady friend, who, upon commencing firing, was greeted by a hot case-mouth to the cheek, followed by a strike to the forehead.  After clearing and checking the weapon, nothing seemed broken or out of place (aside from previously noticed brass marks on the front of the ejection port), so I loaded another magazine and tested it.  4 of the 15 rounds struck me in the forehead or landed on the top of my head.  1 of the rounds FTEd, and they all seemed to be ejecting fairly weakly.

For reference, here’s the information on this weapon:
Glock 19 gen 3
S/N range: VEX***
Test Fire Date: 6/5/13

So, after taking it down and having a look, then quite a bit of research, and quite a bit of ignoring the fanboys at Glock Talk who will blame any and all malfunctions on sissy wrists and not shooting like a man, I’ve learned the following:

  • At or around Oct. 2010, Glock began to use a different process to manufacture internal parts including the locking block, firing pin, and of note to us here, the extractor.
  • The manufacturing process in question is “MIM” or Metal Injection Molding.  This is in contrast to the previous machined/tooled parts which were of much higher quality.  This was clearly done as a cost-cutting measure.  There have been cases of other manufacturers switching to MIM parts and also having severe quality problems.
  • The QC on the LCI (loaded chamber indicator) extractors, specifically the 9mm ones, seems to have suffered to the point that they’re out of spec, though Glock wont admit it, and many of them have been measured and shown increased distance between the Breech Face and Extractor Claw, allowing too much play with the case as it’s being extracted.
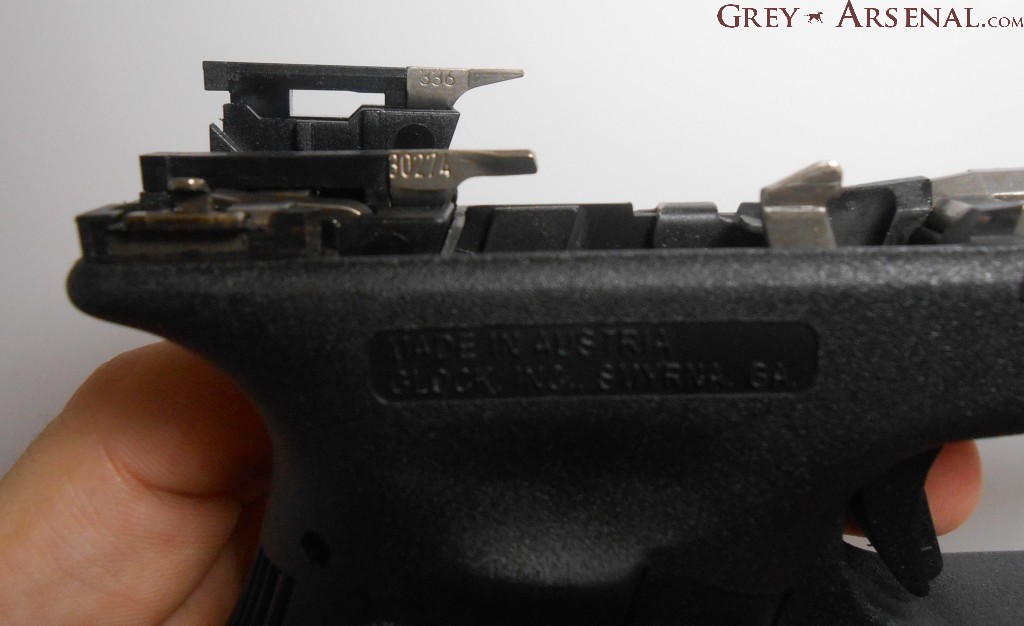
  • This problem, combined with the fine-pointed shape of the original ejector pin (marked 336), has caused the erratic ejection pattern, mostely due to the round bouncing around haphazadly around between the breech face and interior of the slide before finding it’s way out, or not, in the case of the FTEs experienced.
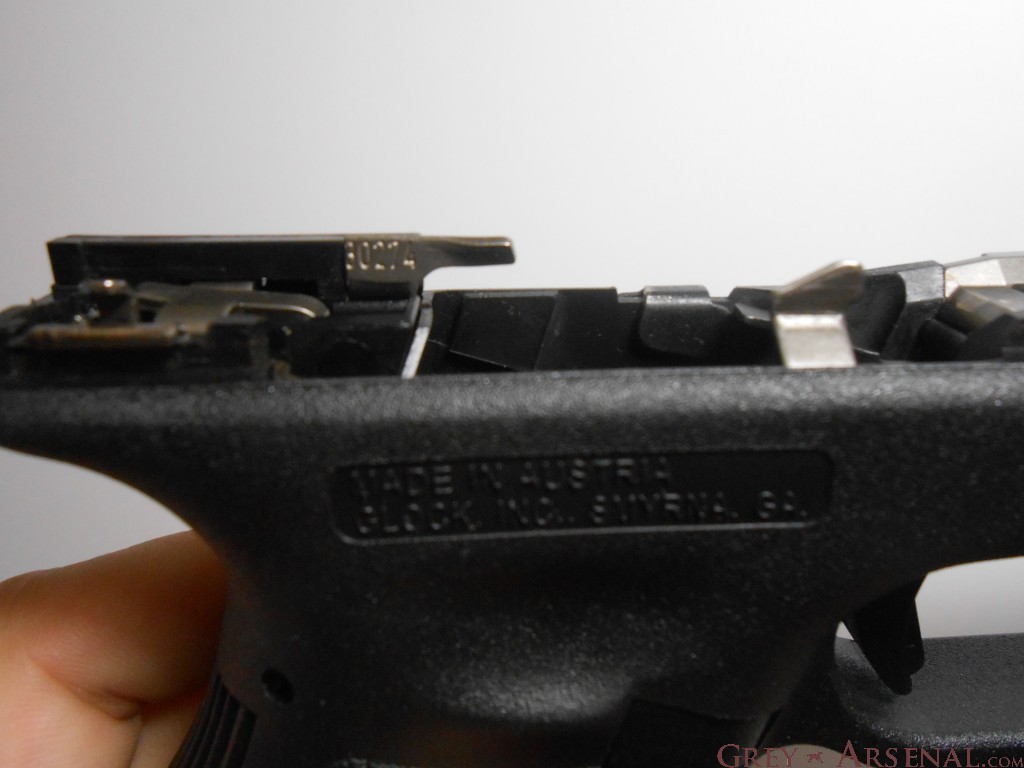
  • Glock has been rather cautious to not put out any direct statements about the problem, but have redesigned the ejector to a more broad shape (now marked 30274), and have been replacing the older ejector on Gen 4 pistols sent in for service that were having this problem.  Sadly, it usually takes a couple of round trips before any progress is made, and even after all that, many people report the problem is not solved.

So, that being said, I’m going to work this out myself, and avoid several months of thumb twiddling each time wondering if my gun is going to come back from Smyrna, GA in working condition, or if it’s just going to nail me in the forehead and/or try to burn my SO’s cheek off again.  I’ll start with the cheap (and in this case, the most widely reported solution), and work my way from there.  First stop, replacing the 336 ejector with the newer 30274 ejector.  Now, since you can’t just buy the ejector, as that would be WAY too easy, you have to buy a replacement trigger housing.  But- they don’t make a gen3 trigger housing with the 30274 ejector (they probably they don’t want to admit there’s a problem), we need to order a gen 4 trigger housing, extract the ejector pin, and swap it into my gen3 trigger housing.  Luckily, it’s an easy enough job, and the new trigger housing is only $9.95.  You may want to go ahead and order a new gen3 housing with the 336 pin in it, and swap those, just so you’re not altering your original in any way, but I’m not going to worry about that.

*UPDATES TO COME*  The first part is in the mail, later updates will come.  Just in case you’re following along and want to go ahead and get all parts in one go and not have to play the waiting game in case the ejector doesn’t fix your problem- my plan B is either swapping in a Lone Wolf Extractor or (more interestingly) swapping in a .45ACP extractor used on the G21/30.  This has reports of being a good fix, because the parts are dimensionally similar enough to fit, and the .45 extractor has a slightly shorter gap between breech face and claw.  It also holds the case at a slightly different angle, more reminicent of the older non-LCI (loaded chamber indicator) extrators on gen 2 Glocks (back when they worked like a charm).

UPDATE #1

Thanks to Mr. Humke at GlockParts.com, LLC, I received my new Gen4 Trigger Housing with the 30274 ejector within 3 days.  The difference between the new one and the older 336 ejector was pretty huge.

DSCN1319

Sadly, due to my schedule, I haven’t been able to get back to the range to test it just yet, but hand-cycling snapcaps produced a perfect pile at the weapon’s 4 ‘o clock, so we’ll see.  *UPDATES TO FOLLOW*

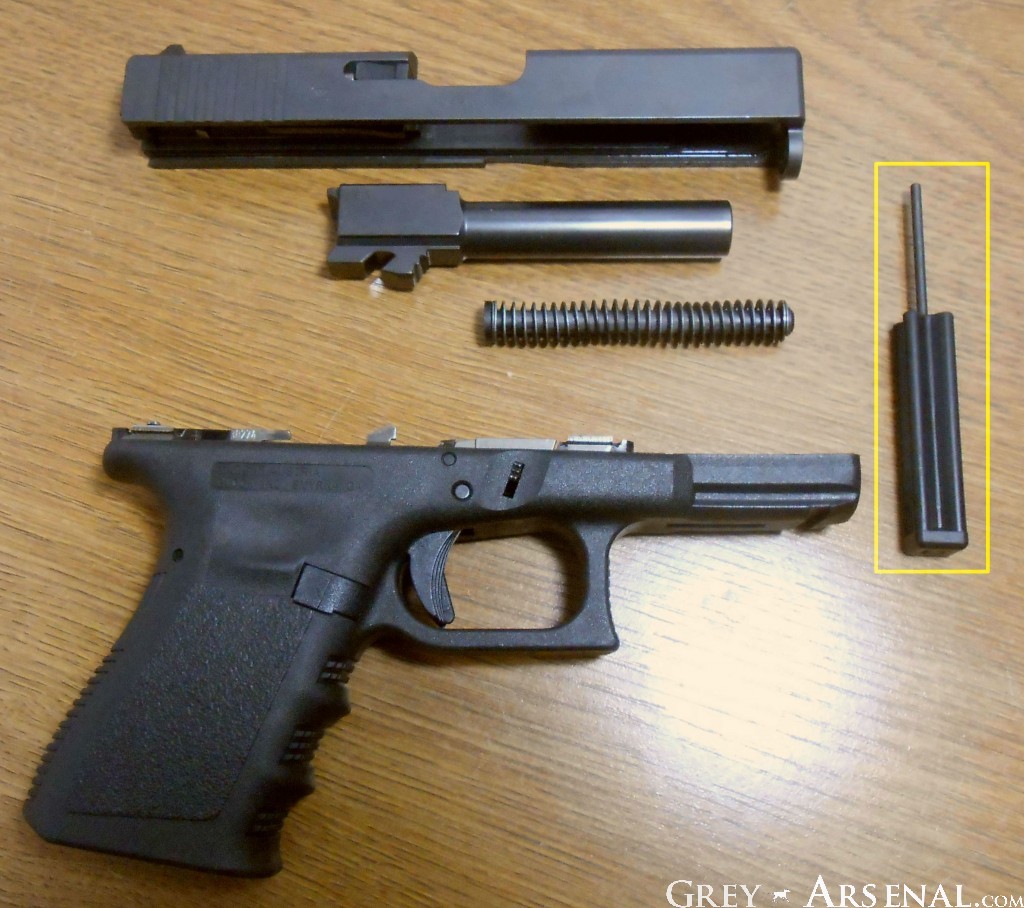
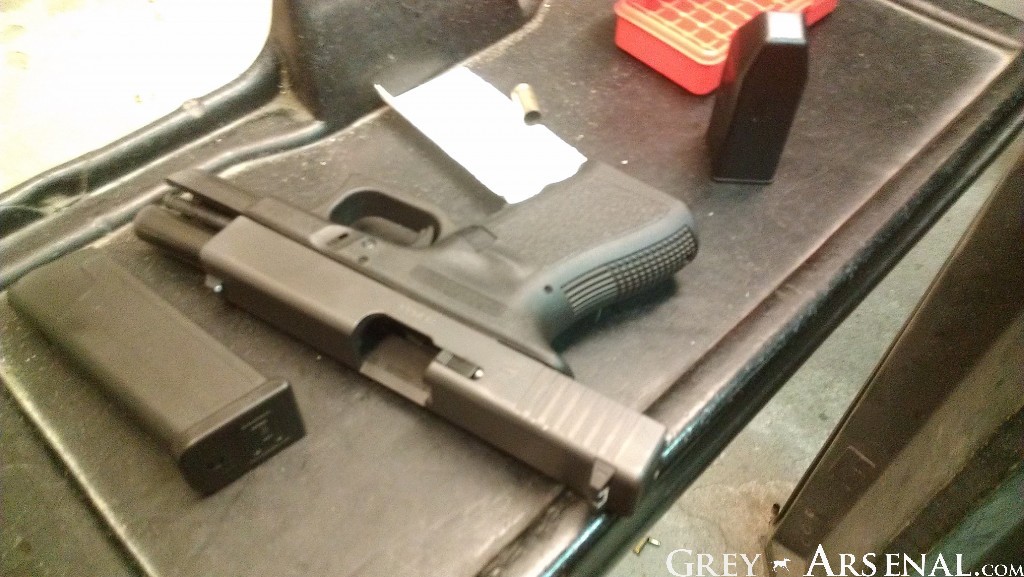
As for the installation, I’d say if you’re comfortable field stripping, this isn’t too much of a stretch.  The Glock is easier to work on than I thought, they weren’t kidding when they say how few parts there are.  The only tools you’ll need are a punch, preferrably a Glock Disassembly Tool (pictured below) and a tiny flathead screwdriver. After removing the slide from the frame, you’ll need to use the tool to push out the marked pins from the frame.  These are different sizes, so be sure to keep track of which one’s which (though it’s easy, big, medium, small, from front to back).

glock toolpins

After this, you’ll need to use something to pry up the Locking Block (pictured below).  It should come right out rather easily.  When removing this, note the position of the Slide Catch Lever, you’ll need to put this back in afterwards.

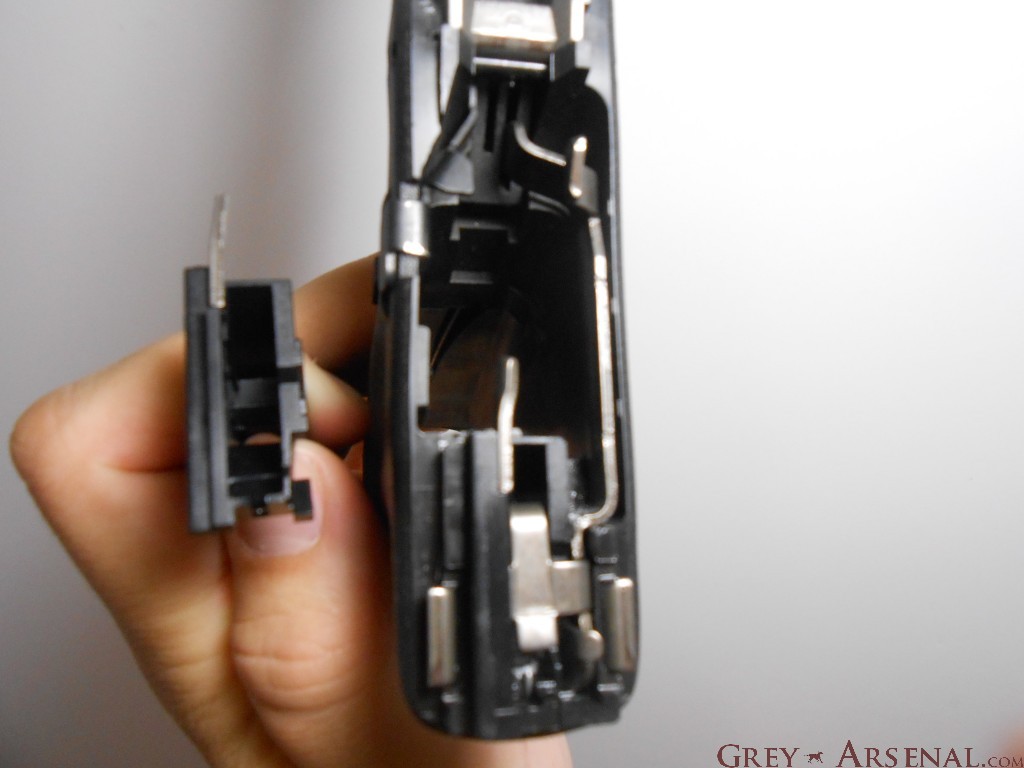
Locking BlockAfter the Locking Block is out, you’ll be able to remove the Trigger (along with the Slide Catch Lever) and Trigger Housing out of the frame.  You can disassemble further, but this is really as far down as you need to go.  The Ejector pin simply pulls forward out of the Trigger Housing, though you’ll likely need to use the flathead to push it from the rear to get it started (you can see rear of the Ejector pin at the rear of the Housing).  After getting it far enough out, either pull out with your hand, CAREFULLY use the screwdriver to pry it out from the front, or use a pair of needle nosed pliers (you’ll want to wrap cloth or electrical tape so as to not scratch) to pull the pin out the rest of the way.

Once you have both pins out, push the 30274 ejector into the Gen3 housing, making sure it’s fully seated, and reassemble your weapon in reverse order.  The only tip I have here is to get the Slide Catch Lever in place after the trigger, then put on the Locking Block, which compresses the spring.  Use your Glock Disassembly Tool to help align things when reinserting the roll pins.

DSCN1316DSCN1318

UPDATE #2: Confirmed Fixed.

IMAG1506

Well, there we have it folks.  Fired 65 rounds today, nearly all perfect 4-5 o’clock ejections with one stray towards 6 o’clock, but soared a few feet over my head.  I think we have a winner.  Time (well, a few hundred more rounds) will tell, but based on how miserable the last 35 rounds were prior to replacing the ejector, compared to how it performed today, I’m going to have to call this one a win.  GLOCK- please start using the 30274 ejector in all current production 9mm models, not just the Gen4 models.  That is all.