Category Archives: Review

Taurus Raging Judge Magnum

Raging Judge Magnum
Raging Judge Magnum

The Taurus Raging Judge Magnum, an amalgamation of the Raging Bull series, and the hybrid revolver/shotgun Judge.  Nothing I’ve ever handled can be described quite as well as a “hand cannon” as this behemoth.

DSCN1503

DSCN1502

Far surpassing the abilities of the Judge, this monster of a handgun is rated for not just .410 and .45LC, but as the Raging Bull’s Red Stripe grip would indicate, this one can handle the pressures of a .454 Casull.  Weighing in at over 4.5lbs empty, it handles the massive recoil from even hot .454 loads (tested with Hornady 240gr XTP Mag and 255gr Flat Tip) admirably.  That touted red raging bull backstrap really helps keep your hands from cramping immediately, and work very well to distribute the shock.  When shooting the lighter loads, .410 and .45LC, the weight of the Raging Judge Magnum negate the recoil to the point that it literally feels like shooting a .22lr, and it’s an amazing feeling.

DSCN1498

rjmrange

The other thing amazing about it, is that the rifling of the barrel was designed in such a way that accuracy is retained with both .410 Buckshot (Winchester PDX1 being my favorite of those tested) and .45LC despite the long “jump” to the rifling due to the cylinder length. The front fiber optic sight aided in this, and was a pleasure to use.

DSCN1496

Trading Guns the Texas Way

guns_money_5162303_std

When it comes to buying on the cheap, a firearm is a lot like any other big ticket item in that the MSRP tends to be a lot higher than what you actually pay, and it depreciates immediately as soon as it’s not “new” anymore.  Not by much, mind you, as anyone searching listings will see “New-in-box condition” or “only xxx rounds fired” and demanding retail prices, but these still tend to sell for 10-20% under retail.  Obviously, like anything else, it feels great to go to a store, pick the one you want, and get it new with all the assurances this grants.  But don’t discount buying “pre-owned” or even better, trading.

tgtEnter Texas Gun Trader.  Obviously, there are other avenues for getting like-new firearms at a discount.  You could visit a local gun store or range, which always have used/consignment sales, and it’s the next safest to buying new in a store, but you’ll be paying inflated blue-book prices, so it’s the costliest.  The next option is buying online, at places like Gunbroker, which I’ve used in the past.  This place is great since it’s like ebay, you can usually find what you’re after, and pay a decent price, but then you have to deal with shipping and arranging an FFL transfer, which will usually cost  you from $35-50 on average, and in a growing number of states in the northeast, much more.

premierarms

Texas Gun Trader is different, in that it’s merely a place to post ads for FTF (that’s, Face-to-Face) transfers or trades, which are legal in Texas.  I’ve used this successfully on several occasions both selling, and in the last two cases, trading.  You can either post what you have for sale and list the price or trades in which you’d be interested (WTS ad), browse sale ads to find something in particular if you’re buying, post a WTB ad with what you’d like to buy and what you’re offering, or if you have something you’ve lost interest in and want to see if anyone is looking, just search for it and see if it shows up in an ad as something someone wants, and see if you’re more interested in what they’re trading.

Obviously, this is place where you’re most likely to get a deal that would be favorable to you, but it’s also the riskiest.  You’re meeting someone you don’t know to trade big-ticket items and/or large sums of cash, usually on (hopefully) neutral ground, and you have no guarantee of the condition of what you’re getting aside from what you’re able to determine in a quick inspection.  Additionally, some sort of instrument of legal protection is always a good thing,  on which I’ll also shed some light.

Things to consider:

  • Always meet in a well lit public place (if at all possible, during the day).  I don’t mean go do a gun deal in a Starbucks or anything, but a well lit parking lot with some activity does nicely.
  • If cash is involved, bring a Counterfeit Detection marker.  A few dollars here will save you a hell of a lot of headaches later.
  • Bring a flexible bore light (which you should have in your cleaning kit already) to help inspect the firearm you’re acquiring.  Be sure to check up ahead of time on things to look out for and instructions on basic field strip.  If the other party declines on letting you field strip (or doesn’t at least offer to do it for you), walk away.
  • Always, always, always, complete a bill of sale, and get one in return if guns are trading hands both ways.  Texas Gun Trader has a good simple one to use posted on their site.
  • Don’t shortchange yourself.  Don’t take the first offer you get, unless you’re really in a rush to make a deal.  You’ll get a lot of crap offers, but might get something you weren’t considering that will surprise you in a good way.
  • Remember that this is about trading- that means if you want something and don’t necessarily want to add cash to the deal, substitute ammunition, especially if you’re trading out of that caliber already, offer it up as part of a deal.  For example, I’ve gotten particularly good deals by offering up .40S&W ammunition after I’d sold or traded off my firearms in that caliber and no longer had need of the small stockpile.

That’s about that.  Enjoy and be safe.  If you have related experiences you’d like to share, or knowledge of other trader sites like this available to residents in states other than Texas, please leave a comment!

(Two Photos used in this article were sourced from Premier Arms, LLC.  If requested, I will remove and replace them ASAP, but I just wanted to be sure to give them proper credit and go as far as imbed links to their homepage with the images)


Walther P38 / P1 Compare & Field Strip

DSCN1447Lets move on last week’s post in France to wartime Germany where we’ll be getting intimate with the Walther P38, and it’s post-war relative, the P1.  First produced in 1939 by Walther Arms to serve as the service pistol of the Wehrmacht, the P38 is a first-of-it’s-kind locked-breech semi-automatic pistol with a DA/SA trigger.  This is also the earliest handgun I’m aware of which includes a Loaded Chamber Indicator (in this case, above the hammer).  More on that later.

DSCN1451

Chambered in 9mm Luger similar to their previously used P08 Luger, this was a more powerful handgun than the other Walther issued to the Wehrmacht, the PP/PPK.  The original wartime P38s were produced from 1938 to war’s end in 1945.  17 years passed before the Bundeswehr announced that they would be adopting the P38 as their service pistol, and in June of 1957 production of the P38 recommenced.  These were produced until 1963, when an updated design was adopted, referred to as the P1, which was finally phased out completely in 2004, replaced by the HK P8/USP.

DSCN1452

The major difference between the earlier P38 and the P1 variant is construction of the frame, which was switched to Aluminum in the P1.  As is visible, the grip design also changed from grooved to checkered.

DSCN1448

DSCN1447

The top example is a wartime P38, and the bottom is a P1 produced in late 1968.

They’re still considered to be great shooters, and while not having the greatest DA trigger pull in the world, their SA trigger pull is extremely crisp, and has the shortest reset I’ve personally experienced.  They’re well balanced, and even the aluminum framed P1 has very comfortable recoil.

ipb-walther-p38

Right, onto the tear down-

  • Remove the magazine via the bottom magazine release, and open action to ensure that the firearm is unloaded.
  • DSCN1454
  • Swing the slide release located on the front left of the frame down and forward, noting how it aligns to allow the slide move forward and off the frame.
  • DSCN1455
  • Disengage the slide lock if necessary, and move the slide forward only to the point where it would normally rest.  At this point, de-cock the hammer to allow the slide to be fully removed from the frame.  The de-cocking lever may be used carefully, but it’s preferable to just lower the hammer gently while using the trigger.
  • To remove the barrel from the slide, simply push the “button” (locking block operating pin) visible at the rear of the barrel assembly, which will push the locking-block wedge out a bit, allowing the barrel assembly to be withdrawn from the front of the slide.
  • DSCN1458
  • DSCN1459
  • DSCN1460
  • At this point, you have access to everything you need for a decent simple clean ‘n lube.  Notice the unique dual recoil springs on either side of the frame.  These can be removed, if desired, by either using a small tool to pull the spring back away from the contained rod at the front far enough that you can remove the rod, then withdrawing the spring OR using a tool to push the spring forward a bit from the rear until it can be extracted from the wider area at the rear.  I prefer the first method, but didn’t bother showing it, as it’s rarely necessary, and pretty easy to figure out.
  • One thing I would check out while you have it apart, however, is the Trigger Bar and Sear are interacting correctly.  To get access to this, use a small flat-head screwdriver to remove the Grip Screw from the left side of the firearm.  Remove the right side grip panel first, then maneuver and remove the left side panel, taking care not to damage it on the slide release.
  • DSCN1461
  • DSCN1464
  • What you’re looking for is on the right side of the frame, previously covered by the right grip panel.
  • DSCN1463
  • The grey part with the hole there is the Sear.  A problem I’ve seen develop with the P38 is the Trigger Bar spring coming loose, and not forcing the “duck bill” hook of the Trigger Bar from interacting with the corresponding notch in the Sear when pulling the trigger.  This can lead to a dangerous situation where you pull the trigger, no bang happens, and the weapon is now Condition 0, and has a malfunctioning trigger, a VERY dangerous situation.  A weak/worn spring can also cause this.  To check, be sure the spring is where it should be, then cock the hammer, and slowly pull the trigger (lowering the hammer with your thumb) to watch the action of the trigger bar on the Sear.  Watch out for this:
  • DSCN1465
  • If, when you pull the trigger, the Trigger Bar hook doesn’t positively catch the notch in the Sear, you have a problem, and should find a replacement Trigger Bar Spring.

Reassemble in reverse order, making note to insert the barrel assembly into the slide with the locking-block pushed out (that is, button pushed in so the locking-block is lowered), and when replacing the slide to the frame, make sure to push the locking-block back up so that it’s able to stay with the slide when you retract it far enough to re-engage the slide release.

Oh, one more thing to share!  The Loaded Chamber Indicator I’d mentioned.  Pretty interesting really:

DSCN1467

Note the protruding post at the top of the breech face?  When a round is chambered, that rod is pushed back against a weak spring, and out of a small hole above the hammer on the rear of the slide, making this visible:

DSCN1468

There are slight differences between the P38 and P1 in the design of the “Cartridge Indicator Pin” channel (as evidenced below), but it works the same way on both.

DSCN1450

Next week, I think we’ll get back to a more familiar end of the 20th Century.

Mossberg 500 ‘Ultimate Arms Gear’ Kit Review / Install Guide

DSCN1417

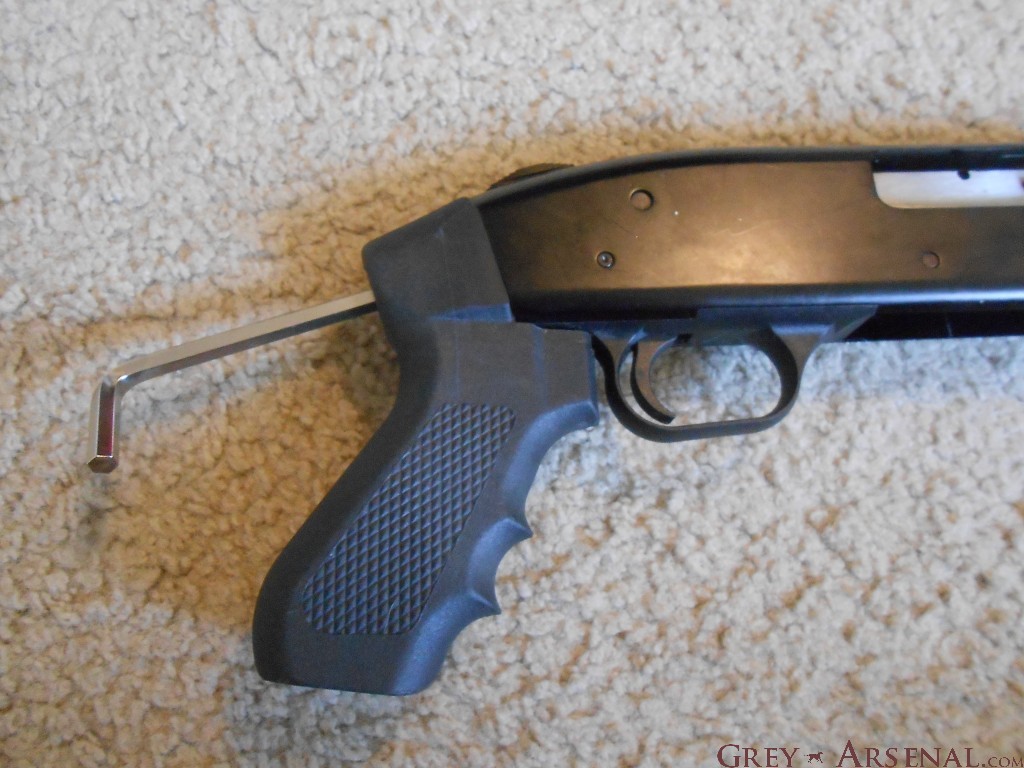
I recently went shooting with a friend who had put a Kicklite Recoil Reduction stock on his Mossberg 500.  I liked the feel of the AR-style stock, and the recoil reduction did feel nice with heavier loads.  After thinking about it, I figured I’d accessorize my old Mossberg 500 Cruiser a bit, for my audience’s benefit, of course.  While I was looking, I decided I didn’t need to spend the extra money on the recoil reduction system, but Kicklite also makes a “Field Series” that has the same great feeling butt pad (seriously, this thing is really soft in the right places) but without the recoil absorbing system in the “buffer tube” that’s in the more expensive models.  I ran across a kit with a few extras for the same $69.95 MSRP as the Kicklite Field Series and free shipping.

It includes the Kicklite Field Series stock, a Shell Holder that can be attached to either side of the stock, and a TruGlo Fiber Optic sight (though it may be a knock-off, works all the same).DSCN1420 DSCN1424


Anyway, here’s the rundown of my thoughts on it:

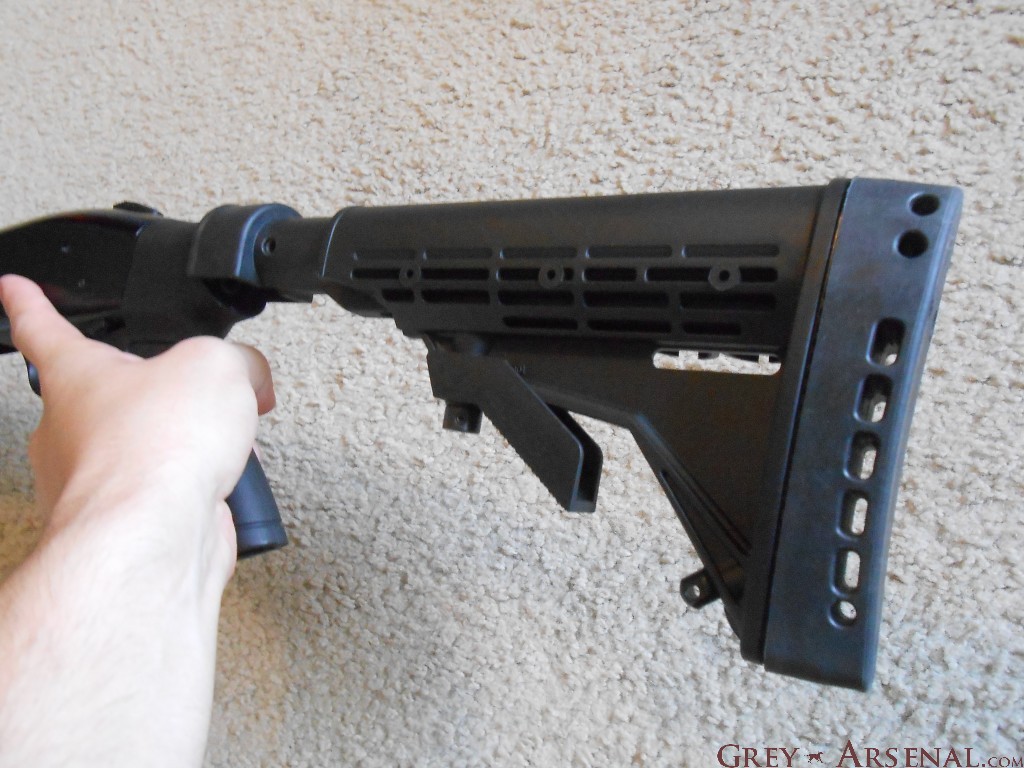
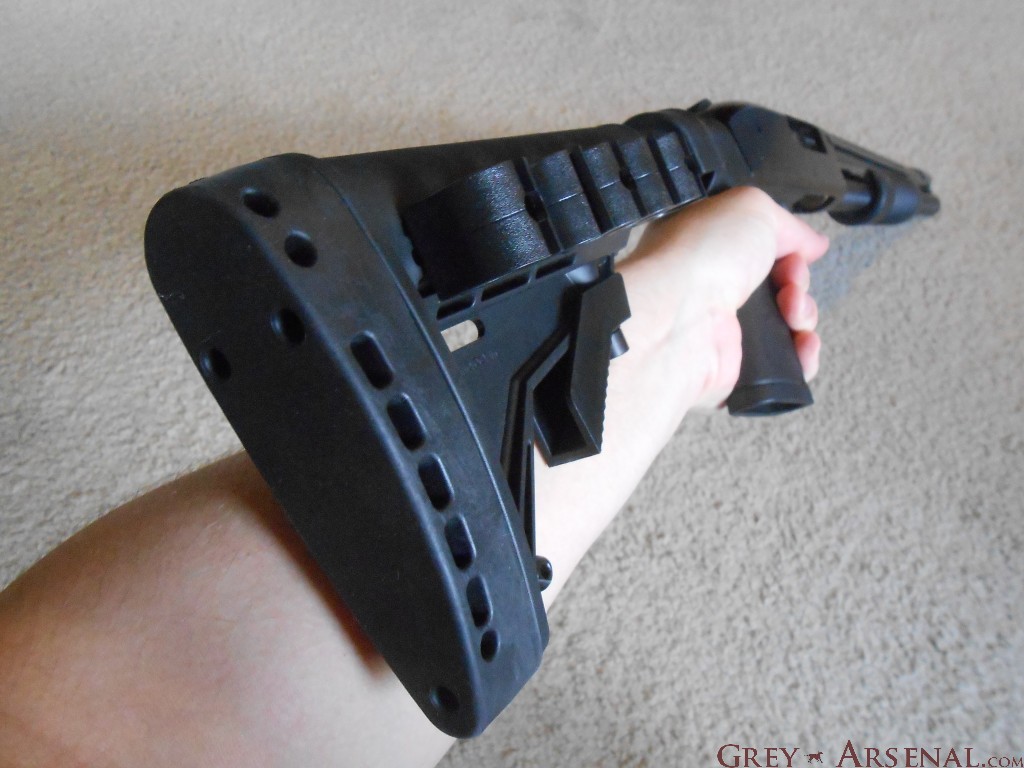
Stock feels nice, is just as adjustable as a standard 6-position AR stock, is angled down just slightly making a decent cheek weld easier, pistol grip feels fine, the whole package is solid.  As mentioned before, you won’t believe how nice that buttpad feels on your shoulder, even after a while of shooting.

The Shell Holder could be better, as it’s just hard rubber, but it’s easy to mount on either side of the stock, and for my purposes it seemed to hold the shells nice and tight, but reviews on Amazon are mixed- I pretty much considered this just a bonus though, and as I said, it worked just fine for me.

The Fiber Optic front sight is pretty awesome, much nicer to look at from behind than stock gold bead on there.  Held on just fine, despite what some of the other reviewers had said.  Also very easy to mount- more on that in a moment.

Installation Guide

First up, the stock.  This may vary a tad depending on your current configuration, as this was written based on a Cruiser model (pistol grip only).  The only tools here that you’ll need with the kit are a 1/4″ Hex Key and a regular sized Phillips Head Screwdriver.

DSCN1428

Unscrew bolt on the rear of the grip with Hex Key as shown.  Be sure to hang onto the washer and crush washer (if applicable).  The new stock lines up perfectly, though took a bit of a nudge to get it all the way on there (fits pretty tight).DSCN1431

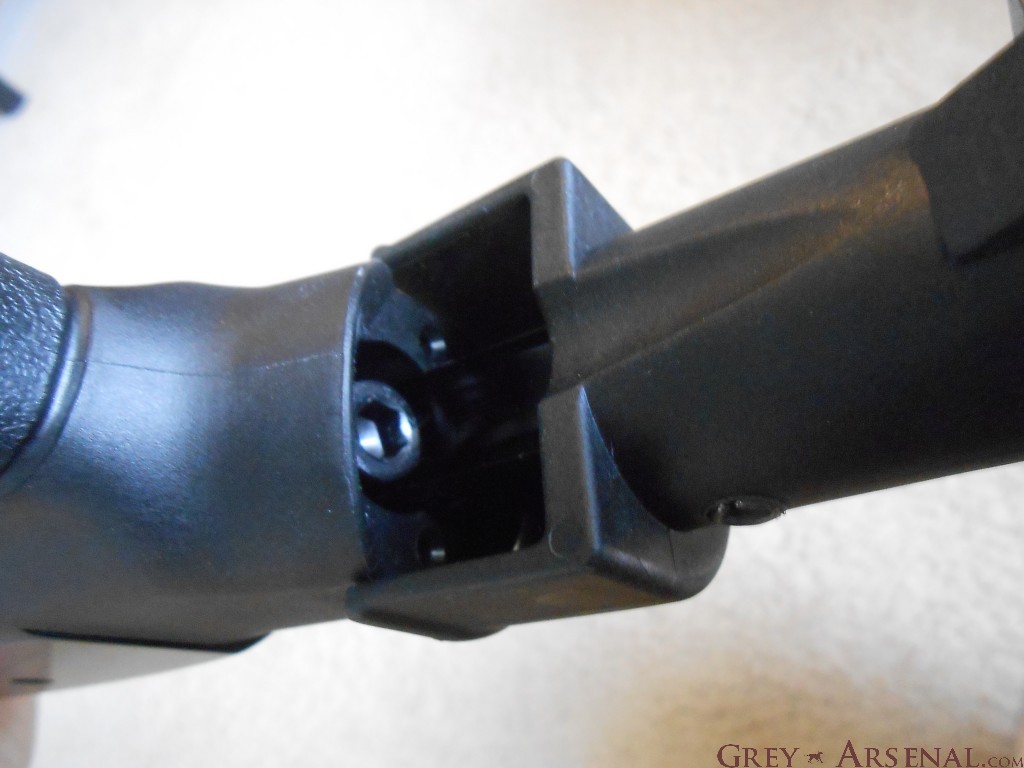
Replace the Hex nut w/ washers into the same location, and tighten.  The angle is a bit odd, so it may take a series of short turns and re-positioning, but it’ll eventually get on there nice and securely.

The Shell Holder comes with a couple of small screws, and is pretty self explanatory.  Just line up the holes in the Shell Holder with the pre-made holes in the stock on the side of your choosing, then screw in the provided screws until tight.

DSCN1426DSCN1425

Lastly, the Fiber Optic sight, which was a tad confusing, but only because I felt like I was going to break it putting it on.  It’s tougher than it looks, however.  Basically, just get it in place above the barrel where it’s going to go, lining up the front notch with your front bead sight.  When in place, push down with your thumbs with an even pressure on the front and back, and it’ll snap on there.DSCN1422

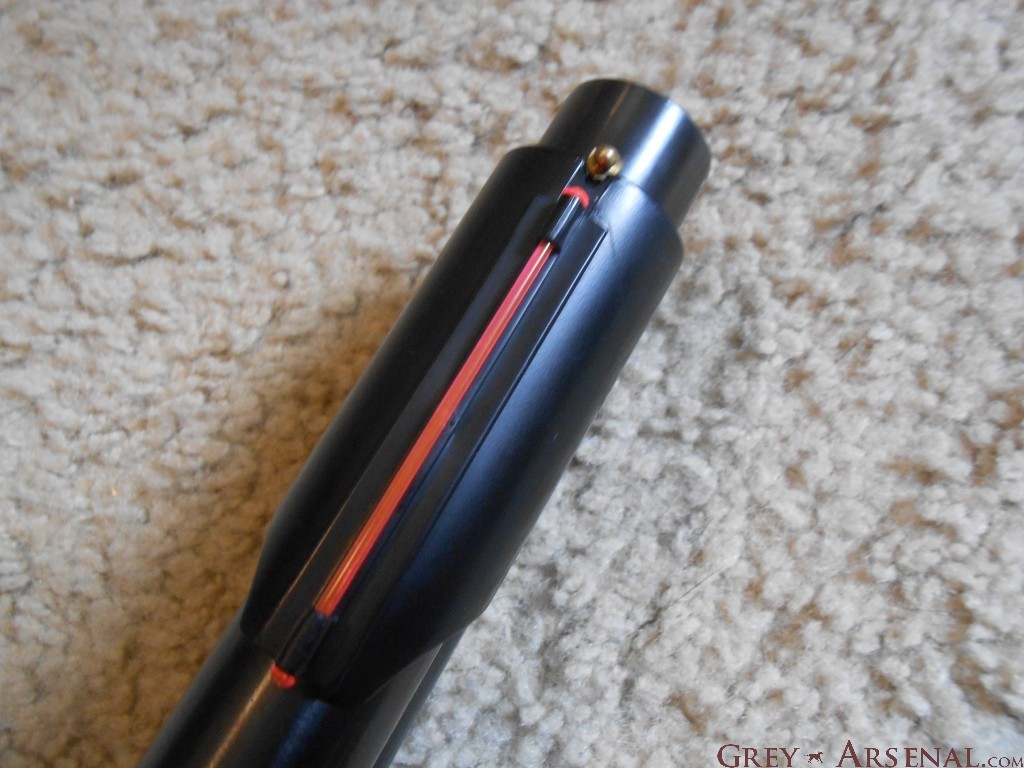
If you didn’t get it right the first time, it’s seriously difficult to move due to how tight it fits, it’s better to pop it back off from below and try again.

Well that’s that.  Oh, maybe not, the links in this review were specific to the 12ga Mossberg 500.  If you have a 20ga Mossberg (500C), use this link.  The whole package here is complimentary, the stock along with the front sight is great, and the shell holder is a nice bonus.  Also great for the price.  I’ve only had it to the range once, but it feels pretty solid.  I’ll update if that changes.